Showing posts with label Distress Inks. Show all posts

Wednesday, September 12, 2018

Cricut Happy Fall, Y'all - Lori Whitlock Pop Up Box Card

👉  "Winter is an etching, spring a watercolor, summer an oil painting, and autumn a mosaic of them all."  - Stanley Horowitz


.   
I have oodles of delightful house images in my craft stash in every form...stamps, die cuts, embossing folders, designer paper, fabric..apparently I'm obsessed.  I'm obviously drawn to these cozy images and the warm feelings they evoke.  This darling Lori Whitlock Pop Up Box Card House has been patiently waiting for my attention for ages and I finally found the perfect way to make it my own. I traded it's original sunshiny summer scene for a warm, vibrant fall landscape.


The cut already had everything I needed to create a charming autumn neighborhood.  I added a few more colorful trees from Cricut Design Space which I easily sized in different styles to fit my variegated orchard.  Patterned designer paper in dots, checks and swirls is always a fun choice for tree leaves and I sponged the edges with distress ink to soften the colors. I changed the original sentiment to "Happy Fall, Y'all" and viola, a colorful fall greeting for my friends, ushering in my favorite season.  Now I'm off for a walk in the gorgeous wetlands near to my home to watch the trees slowly evolve into a vivid kaleidoscope of color. It will take awhile but it'll be fun watching the daily transformation and well worth the finale.  Awww, Autumn.

Thanks for visiting.
Go forth and create something fabulous.
Nancy

Playing along with:


Sunday, August 12, 2018

Christmas In July - Richele Christensen Class in Dixon, CA


Hi everyone,

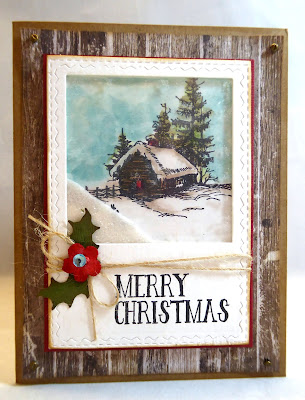
A group of my besties and I had the privilege of attending Richele Christensen's "Christmas in July" class recently in Dixon, CA.  She is an absolutely brilliant designer for Sizzix and Tim Holtz. But best of all, she is a dear friend who started her impressive career teaching classes at the Stamp Art Shoppe near where I live.  Her loyal groupies, of which I am a proud member, love it when her busy teaching schedule includes a class  in our neck of the woods.  This gorgeous snowy  woodland scene is my favorite of the cards we made. We used the Sizzix Paper Snowflakes Thinlets, Stitched Oval Thinlets and Woodlands Thinlets for this card.


My plan is always to get my Christmas cards done way before the holidays to relieve my holiday crafting stress but, thus far, that dream has never materialized.  This year, Richele's class has put me in the mood to get my creative juices flowing with Christmas spirit early and, after this inspiring class,  I think I'm already hearing some distant jingle bells. A Stacked Baroque Thinlit and Retro Merry Christmas was used here.


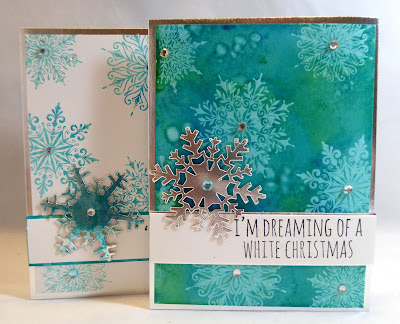
We made these two cards using Tim Holtz Lift Ink on a alcohol ink and Yupo  background.  Jennifer Mcguire shows how it's done in this video.  You really have to try this fascinating twofer process.  Stampers Anonymous Mini Swirl Snowflakes were used for the stamping.


I've made several shaker cards in the past with mixed results, so I tend to avoid them since the tiny bits seem to stick to places where they don't belong.  Somehow this card seemed easier to accomplish with Richele holding our hands.  However, fifty of them might be a little daunting, so I'll save this one for someone special. The winter scene stamp is from Stampers Anonymous.


Festive gift card holders were fast and easy using the Sizzix Gift Card Bag Thinlets.   

I learned some interesting new techniques in this enjoyable class and I love every card we made. You'll find Richele to be one of your favorite instructors if you are ever lucky enough to take one of her amazing classes.

Thanks for visiting.
Go forth and create something fabulous.
Nancy


Thursday, November 9, 2017

Magenta Style Christmas Cards - Dimension with Corkboard and Chipboard


Hello everyone!  I just found another treasure in my Christmas stash that I'm excited to share with you. I made these cards a while ago in a Sandy Brien class at the Stamp Art Shoppe and I still think the designs are stunning. Magenta corkboard and chipboard give them beautiful dimension. 

TECHNIQUES:
I sponged the tree card with "lettuce" alcohol ink using an applicator tool and the ball ornaments with "red pepper" alcohol ink using Q-tips.  When the tree was dry, I stamped and embossed the snowflakes with white embossing powder.  I punched out a chipboard snowflake and painted it with gold metallic watercolor. Lastly, I stamped and embossed the sentiment with  white embossing powder.  


For this card, I stamped and embossed the snowflakes and words as shown.  I inked a large snowflake and embossed with white embossing powder. I splattered the background with white embossing powder and heated with my embossing tool.  The smaller snowflakes were painted with metallic paints in gold and silver.  


I colored the corkboard cardinal on this card with "red pepper" alcohol ink using a Q-tip.  I stamped and embossed the snowflakes and words in white on the small layer as shown. I stamped and embossed the reindeer with a patterned snowflake stamp using Versamark ink and white embossing powder.  After the reindeer cooled, I inked and embossed him with clear embossing powder. It doesn't show up here, but the shiny finish looks amazing.


I think this was my favorite card to create. I colored the chipboard birds and greenery with markers.  I slightly moistened a paintbrush and blended the colors.  The edges of the chipboard are outlined with a brown pen and I used a black Sharpie for the eyes.  I used a white colored pencil to add the lines on the leaves and to color the birds' chests. When the chipboard was dry, I added two coats of clear embossing.  For the snow, I sprinkled a little bit of embossing powder onto the chipboard and heated with my embossing tool.

TIPS:
Glossy accents is a good sturdy glue for adhering heavier objects like chipboard.
When layering embossing powder, be careful to let each layer cool slightly before adding the next layer.


TOOLS AND SUPPLIES:
Magenta Corkboard punch outs
Magenta Laser-cut Chipboard 
White embossing powder
Versamark Ink
Alcohol Inks - Lettuce and Red Pepper
Metallic watercolor
Heat tool
Stamps: Magenta -45007L and 07484J
Cardbase: 5 1/4 x 10 1/2
Patterned paper

Whew!  That's a lot of information but these cards are really worth the effort.  I think they're so lovely and elegant. I'm glad I bought extra chipboard and corkboard so I can play!

Thanks for visiting.
Go forth and create something fabulous.


Sunday, October 29, 2017

More Sizzix Bell Jar Cards - Christmas


In a recent post, Tim Holtz Halloween Bell Jar cards, I showed you some super fun Halloween cards I created in a Sandy Brien class at the Stamp Art Shoppe last fall.  Here are some more amazing holiday cards created in the same class. Sandy's card designs are always so beautiful and having her as an instructor is such a treat.


I remember being delighted with how these cards turned out and thinking I would make some for other occasions during the year.  Well, it's a year later and let's just say I'm glad I saved the directions. 

Want to create some of these darling holiday scenes for yourself?  Here's some of the things we used.

        Card Base: 10" x 7"
        Large Layer (Patterned Paper) 4 3/4 x 6 3/4
        Small Layer (Solid) 4 1/4 " x 6  1/4"
        Design Layer: 4" x 6"
        Cardstock for scene die cuts
        Transparency scrap for Bell Jar
        Sentiment stamps
        Sizzix Bell Jar die 658244
        Christmas dies from Impression Obsession and Memory Box
        White embossing powder
        Versamark pen
        Distress Inks
        Gems, stickers

The snow on the pine trees is made by inking the die cut tree with Versamark and then embossing with white embossing powder.

Thanks for visiting.
Go forth and create something fabulous.
Nancy


Thursday, October 12, 2017

Sizzix Tim Holtz Bell Jar Halloween Cards - 2016 Stamp Art Shoppe Class Flashback


While searching through my "Big Box O' Halloween Stuff" for some inspiration and supplies, I was excited to find these fun cards that I made in a class at the Stamp Art Shoppe last year.  Our amazingly talented teacher, Sandy Brien, showed us how to use the Sizzix Bell Jar die with acetate to give a realistic-ish glass jar look.  She instructed us to temporarily center the bell jar transparency on our paper and carefully sponge around the edge with distress ink to make the jar look lighter. We then cleaned and dried the transparency and adhered it to the pedestal after creating our scene.  I had forgotten how cute these cards turned out.  


The ghosts, pumpkins, bats, grass and scene dies are all from Impression Obsession. The leaves were made with punches.  The fabulous bell jar die is Sizzix Bell Jar 658244, which I've seen on Amazon recently.  I have a similar Sizzix Snow Globe die with a Christmas scene that I can't wait to use with this same process. 

Sadly, the Stamp Art Shoppe closed earlier this year, but Sandy still comes to town to teach classes about once a month.  I always look forward to being enlightened by her mad skills and talent.

Thanks for visiting. 
Go forth and be fabulous.
Nancy

Friday, June 2, 2017

Altenew Peony Bouquet Flip Cards


I adore these Tonic Studio Flip Flop die sets when I need to make something special and don't have much time.  I got a little panicky last night when I realized I needed to make two birthday cards and a sympathy card for today.  


I stamped these lavender flowers with Tim Holtz distress Ink.  The layers on these Altenew Peony Bouquet stamps are pretty easy to line up in my Misti if I just pick a few spots to concentrate on.


I'm into stripes lately, both in my quilt borders and cards.  They just seem to coordinate with everything.  This beautiful gold and white striped Stampin' Up vellum called to me from my stash.


I used two different Tonic Flip Flop dies, an oval and a rectangle.  The die cut sets include a large die to cut the flip flop card (over 5 x 7) which can be sized to different dimensions and several layering dies for the shape area. There's a sentiment die for the center, but I chose to pop up my peonies for my focal point and put my sentiment on the back.  I dug out my Marvy stamp pads from a hundred years ago and now I remember why I love them so much.  The pinks and reds stamped very evenly and I am happy with the bright, vivid colors. Good thing I have the reinkers because I think I'll be using them a lot for my layered stamps.


The little swirls around the flowers were the scraps from the die cut frame.  Glad I didn't throw them away!  I added a pretty sparkly gold bow to my side panel and some sequins to match the flowers and I'm almost done.


I use tons of die cut sentiments because I can put them anywhere on the card, even over stamped images, and I don't have to worry about ink smudges.  This "Prayers" image is from Hero Arts and it has several stamp phrases to go with it.  And, of course, I messed up stamping the "sending hugs" phrase, so I just stamped it again on another piece of paper and popped it up over my boo boo. I'm a boo boo guru. 


Thanks for visiting.
Go forth and be fabulous.
Nancy

Adding my card to these challenges:
Really Reasonable Ribbon
Make My Monday
Aurora Wings

Thursday, May 11, 2017

Brushless Watercolor Class - Tim Holtz Distress Markers


A while ago I took an amazing class from Susan Porter, one of my favorite artists, and I'm just getting around to posting the four lovely cards we created.  The brushless watercolor technique has been around for a while and is relatively easy with beautiful results.  The background in each of these cards uses a little different technique. For this card, I used Milled Lavender and Dusty Concord distress markers to color the flowers directly onto the stamp and Peeled Paint and Forest Moss to color the leaves and stems.  After coloring the stamp, I spritzed it with water using a fine mist spray bottle and used gentle pressure to stamp the image onto watercolor paper.  I added Distress Stickles in Dusty Concord to the centers of the flowers and Peeled Paint Distress Stickles to the leaves.


The second card was stamped on Mattekote stamping paper. I colored the flowers with Picked Raspberry and Seedless Preserves distress markers, the flower centers with Scattered Straw and Wild Honey, and the leaves and stems with Peeled Paint and Forest Moss. I spritzed with a fine mist before stamping. The result was a little less textured than the watercolor paper, but just as pretty, I think. 


The third flower has a pallet painted background. I scribbled Scattered Straw onto an acrylic block and spritzed with a fine mist.  On watercolor paper, I used a large flat wet paint brush to paint the rectangular area I wanted for my flower background.  Using the same brush, I picked up the diluted Scattered Straw distress ink from my acrylic block palette and painted in my defined rectangle.  I dried this area with a heat gun and then stamped my image using the brushless watercolor technique.


My final (and favorite) card has a  resist block stamped background.  I embossed the image of the tall foliage on watercolor paper with white embossing powder.   I colored the surface of a 3" x 5" acrylic block with Shabby Shutters and Peeled Paint distress markers.  With the block facing up on my table, I spritzed with water and let the colors run together.  I carefully flipped the block over  and pressed it onto my watercolor paper. I dried it with a heat gun and then stamped my image using the brushless watercolor technique.  

I always forget how fun and easy this technique is.  Have you tried it? You absolutely should!

Thanks for visiting.
Go forth and be fabulous.
Nancy


Saturday, April 15, 2017

Tom Holtz Crazy Birds- Richele Christensen Class


An Easter message from a wacky little bird in an Easter hat and bunny ears says it all. I couldn't resist posting this cute bunny from a Richele Christensen class a while ago because he is just so adorable. Richele posted some of these darling Easter birds on Facebook this week and I wanted to make sure you hop on over to her californiaartgirl blog to check out all her gorgeous work.  


I have known Richele since I took classes from her many years ago at the Stamp Art Shoppe and I am one of her biggest fans. She became a designer for Hero Arts during that time and we used to beg her to sign her artwork in their catalog.  What a bunch of shameless groupies!


She now travels all over the country as a Tim Holtz designer/instructor and creates stunning artwork in mixed media and fabric.  Even though she is so accomplished and "famous" she is still a sweet and supportive friend.  To know her is to love her.