Friday, August 31, 2018

Mo Manning Anne of Green Gables - Copics and Cricut


👉  “Kindred spirits are not so scarce as I used to think. It’s splendid to find out there are so many of them in the world.”  Anne Shirley


Hello everyone, 

Have you ever dreamed of visiting the exquisitely idyllic setting of Green Gables in Canada where the vivacious redheaded orphan Anne lived. Recently I was privileged to do just that for what I now lovingly call my 50th 'Anne'-iversary celebration.  I have loved reading about the Lake of Shining Waters, Lovers Lane and the Haunted Forest from the moment I read the first book in Lucy Maud Montgomery's delightful Anne series. I've read the books umpteen times over the years and practically memorized the movies.  Before our recent trip to the Canadian Maritimes,  I listened to the books on Audible in my car once again and enjoyed them as much as ever  So it's little wonder I had whipped myself into a frenzy by the time we arrived at Prince Edward Island,  the amazingly beautiful scene of the fictional Avonlea where Anne grew into a lovely young woman.  It took three plane rides in one day to get to the Maritime Provinces of Nova Scotia, New Brunswick and PEI from California but it was well worth the trouble 😏.

The Anne of Green Gables Museum is located on the farm of Lucy Maud Montgomery's cherished aunt where she spent many hours penning her delightful prose. Her ancestors still live there and have preserved many lovely antiques and artifacts from Lucy's life.  She patterned Green Gables after this gorgeous, pristine setting where the Lake of Shining Waters sits serenely in the background and stunning tree line paths lead the way to Anne's neighbors' homes.  Prince Edward Island is even more amazingly splendid than I expected and the fictional Avonea and it's occupants have  come alive for me as never before. 

I couldn't wait to color this darling Mo Manning Anne of Green Gables digi when I returned home.   I knew she needed to be nestled under one of her beloved cherry blossom trees, so I kept it simple with a tree I sized and cut in Cricut Design Space.  I added  a few pretty pink  blossoms to make it bloom. I also cut the frame in  Design Space and lined it with a gold leafing pen. Although Anne's orphan clothes were obviously not as bright and cheerful as the ones I colored for her, I couldn't resist making her sparkle like she does in  her books. 

Thanks for visiting.
Go forth and create something fabulous.
Nancy 

Playing along with:
        Mod Squad Challenge
        Retarte Challenge 126
        Coloring in Scrapland


Thursday, August 23, 2018

Hello Birthday Bouquet - Spellbinders and Elizabeth Crafts

👉  "If you have a garden and a library, you have everything you need".   Marcus Tullius Cicero


Hi everyone,

This gorgeous square Spellbinders  frame die seems to be a fave of mine because I keep using it over and over without  realizing it.  I'm thinking some emergency  shopping for fancy square dies  is in order.  Gonna get right on that! Squares seem to be the perfect shape for many of my card creations and I can't get the clean intricate cuts on my Cricut that I'm able to achieve with dies.  Even though this is a birthday card, I thought the hello die cut fit perfectly on the front of my card. What's more happily universal than Hello?  I can add any sentiment I want to the inside of my card to fit my occasion. 

I cut my pretty Elizabeth Craft vase die and Spellbinder frame from glossy gold card stock. It's my favorite for making every card look elegant.   The Elizabeth Craft flower dies were cut from  iridescent mylar paper and I added her peel off stickers to the centers to fit with  my gold theme.  To balance my design, I added a Martha Stewart punched glitter butterfly embellished with more peel off stickers and then an opposing die cut greeting.  This card is fairly flat compared to most of my cards and can go through the mail easily, although I always have to use "nonmachinable" postage, especially with odd shapes.  I don't mind because our cards deserve a little TLC after the time we put into them, don't they?


Greeting dies are my favorite way of adding sentiments to my cards. They add a little dimension and you can find them in all shapes and sizes.  This Happy Birthday to You is one of my favorites.  It's elegant enough to dress up the inside of my card while keeping it clean and simple. It leaves me plenty of room to write a heartfelt message. 

Thanks for visiting.
Go forth and create something fabulous.
Nancy

Playing along with:


Sunday, August 12, 2018

Christmas In July - Richele Christensen Class in Dixon, CA


Hi everyone,

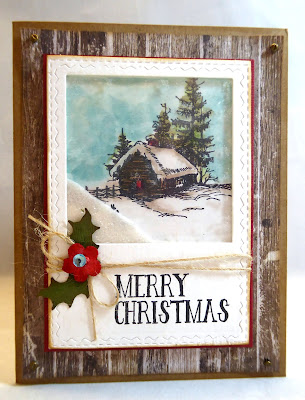
A group of my besties and I had the privilege of attending Richele Christensen's "Christmas in July" class recently in Dixon, CA.  She is an absolutely brilliant designer for Sizzix and Tim Holtz. But best of all, she is a dear friend who started her impressive career teaching classes at the Stamp Art Shoppe near where I live.  Her loyal groupies, of which I am a proud member, love it when her busy teaching schedule includes a class  in our neck of the woods.  This gorgeous snowy  woodland scene is my favorite of the cards we made. We used the Sizzix Paper Snowflakes Thinlets, Stitched Oval Thinlets and Woodlands Thinlets for this card.


My plan is always to get my Christmas cards done way before the holidays to relieve my holiday crafting stress but, thus far, that dream has never materialized.  This year, Richele's class has put me in the mood to get my creative juices flowing with Christmas spirit early and, after this inspiring class,  I think I'm already hearing some distant jingle bells. A Stacked Baroque Thinlit and Retro Merry Christmas was used here.


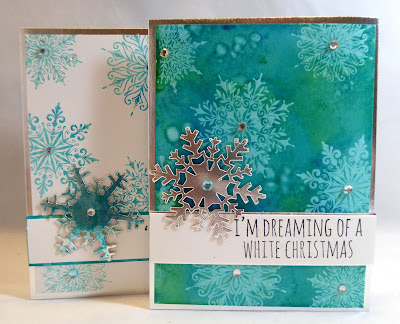
We made these two cards using Tim Holtz Lift Ink on a alcohol ink and Yupo  background.  Jennifer Mcguire shows how it's done in this video.  You really have to try this fascinating twofer process.  Stampers Anonymous Mini Swirl Snowflakes were used for the stamping.


I've made several shaker cards in the past with mixed results, so I tend to avoid them since the tiny bits seem to stick to places where they don't belong.  Somehow this card seemed easier to accomplish with Richele holding our hands.  However, fifty of them might be a little daunting, so I'll save this one for someone special. The winter scene stamp is from Stampers Anonymous.


Festive gift card holders were fast and easy using the Sizzix Gift Card Bag Thinlets.   

I learned some interesting new techniques in this enjoyable class and I love every card we made. You'll find Richele to be one of your favorite instructors if you are ever lucky enough to take one of her amazing classes.

Thanks for visiting.
Go forth and create something fabulous.
Nancy


Friday, August 3, 2018

Howdy Handsome - Lori Whitlock SVG Birthday Card


👉  When you're young and you fall off a horse you may break something.  When you're my age you splatter. - Roy Rogers


Hey everyone,

Two masculine cards in a month...my head is exploding!  Late Fathers Day and early birthday celebrations this year have made for some frantic guy card making.  Lori Whitlock svg's are my go-to resource for manly cards because I can make them clean and simple, something I struggle with when left to my own devices.   I gave myself permission to  adorn my card with  a little heart  and a festive party hat  because even horses need a little flair.

I used this Lori Whitlock svg and found the heart and party hat  in Cricut Design Space. Some bright Nuvo drops spiff up my cute party hat. I even printed the "Handsome" tag with the "print then cut" option in Design Space. I thought adding the "Handsome" after Howdy would leave little question  my card was directed to my extremely good-looking husband. 

Thanks for visiting.
Go forth and create something fabulous.
Nancy

Playing along with:

Wednesday, August 1, 2018

Daughters of Utah Pioneers - Gold Panners Camp Invitations

👉  We should, like our pioneer ancestors, push our handcarts forward with the same fortitude they did.    - Dallin H. Oaks


Hey everyone, 

I love being a  member of Daughters of Utah Pioneers in Northern California because LDS history is so rich here.  Members of the Mormon battalion were instrumental in starting many of the first settlements in California and in fact, six battalion members were present at Sutter's Mill when the initial discovery of gold was made.   Our monthly Camp meetings are a chance for us to share histories of our pioneer ancestors and learn more about our  heritage  And best of all, anyone who is interested in pioneer history is welcome to come to our meetings so we've made some wonderful friends. This year I'm the First Vice Captain of our camp and, of course, I'm always in charge of all things crafty,  no matter what my position.  No complaints here. My first assignment for the 2018-2019 year, which starts in September, was to make a special invitation to our meeting. (We usually use email.)


More and more I'm finding  Cricut Design Space is my BFF. I found this darling handcart image in Design Space on the Heritage cartridge, along with many other vintage images I could have chosen.  I also found the mountains, grassy mound and sun image in the design library  It was a cinch to create a cute little mountain scene for my handcart and size it  perfectly for my A2 card.   I was surprised at how quickly my 26 invitations came together. I think they'll rise to the top of  piles of  junk mail to compete for attention.  After all,  happy snail mail with a hand-licked postage stamp is such  a rare treat these days. To make an invitation is human, to receive an invitation is divine.

Thanks for visiting.
Go forth and create something fabulous.
Nancy