Showing posts with label Valentine. Show all posts

Saturday, February 15, 2025

Valentine Bike Easel Card - Anna Griffin 3D Bicycle Dies

Anything, everything...little or big...becomes an Adventure,
when the right person shares it.  Kathleen Norris


Hey there from Nannyland,


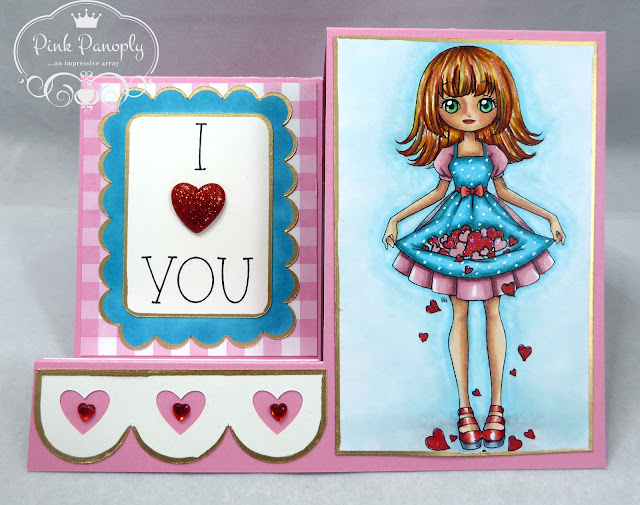
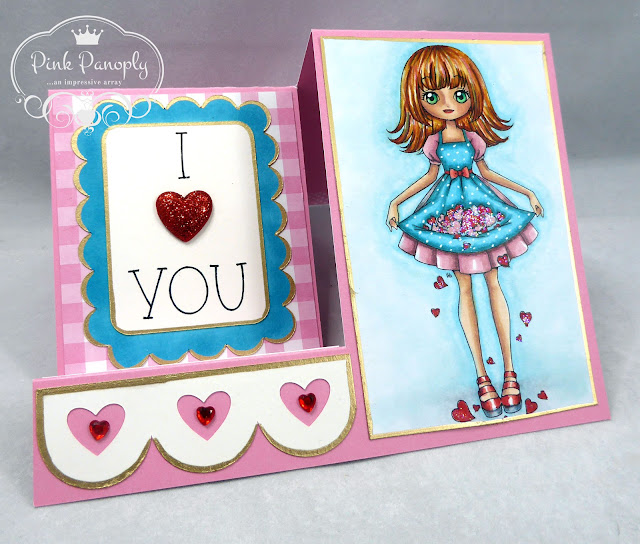
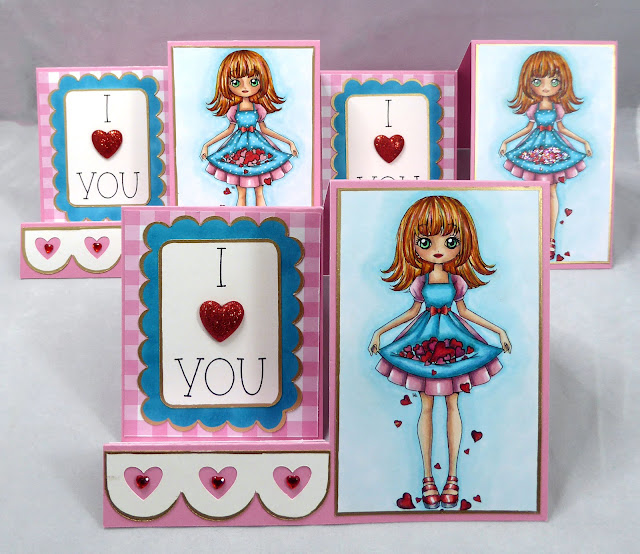
I've been dying to make this adorable Anna Griffin 3D Bicycle Easel Card for ages and this Valentine's Day seemed like the perfect opportunity to pull out these fabulously detailed dies and start creating. All the parts to this fun bicycle are included in the die set to create some really fun layers, including the basket of flowers, banner and flag. Flowers for the basket are included in the die set, but I used some small Spellbinders flowers from my stash to fill my basket.  Accessorizing the dies was delightful using heart shaped gems and embellishments.  I stamped the labels with sentiment stamps from Hero Arts with a personal message for each of my recipients.  Foam tape on the bottom of the label created the depth I needed to make an easel for my bike. 


I  made four of these cards...one for my husband and one of each of three friends.  When their this cute, you can't make just one!

Thanks for visiting Nannyland.
I'll just be here blissfully creating until your next visit. 
Nancy (aka Pink Panoply)

                                                              Playing along with:


Thursday, February 15, 2024

Oh Puhlease Bee My Honey - Spellbinders LDOM Honey Pot

I make art to show my soul that I'm listening. 


Hey there from Nannyland,

I'm not even a little bit disappointed that I joined the Spellbinders Large Die of the Month Club. I've only been a member for a few months, but I have been thrilled with every set that lands in my mailbox each month.  What's not to love about a surprise package of delightfully detailed dies showing up to spark my creativity. 

The January die set is an adorable layered honey pot that comes with a cute detailed bee (with legs, for Pete's sake) and pretty spring flowers.  It's a large size so it fits my usual 5 x 7 card base perfectly with room for a sentiment.  I created my punny sentiment in Cricut Design Space using the writing feature. The curve feature enabled me to match the shape of my honey jar perfectly.  Yeah, I love my Cricut! 

Most of the flowers here were included in the die set, but I created some variety with a few flowers from other Spellbinders sets. I'm really appreciating the versatility of  Spellbinders flowers because the layers give them dimension, but not so much that they get squished in the mail.

I presented this card to my hubby for Valentines Day and he didn't even flinch at the flowery aesthetic.  Maybe it's because he used to be a florist and knows that colorful flowers are for everyone or maybe it's because he knows a card created by me will probably have some girly zhuzh.  Either way, I give myself permission to glam up my cards, regardless of gender, because I gotta be me. 

Thanks for visiting Nannyland.
I'll just be here blissfully creating until your next visit. 
Nancy (aka Pink Panoply)
                                                                Playing along with:
                                                  
                                            Creative Knockouts Challenge #515
                                                         Sisterhood of Crafters - LOVE
                                              Try it on Tuesday - Hearts and/or Flowers
                                                              A Perfect Time to Craft #2
                                                             Ally's Angels Challenge #79
                                                      Beautiful Blossoms Challenge #1
                                                                Daisy Chain Challenge #82
                                                                Critter Crazy Challenge #83
                                             Die Cut Divas - Non Traditional Valentine Card
                                                           Morgan's ArtWorld Challenge # 73

Friday, January 26, 2024

Spellbinders December Large Die of the Month - Cheers to Us

 What we have once enjoyed we can never lose.  All that we love deeply becomes a part of us.
Helen Keller


Hey there from Nannyland,


My first thought when I received my December Large Die of the Month set from Spellbinders was, "Oh, it's so cute, but I don't drink!"  After "mulling" 😀 it over and watching some really cute makes on YouTube, I decided MY bottle contains sparkling cider.  Spellbinders always has such detailed layering pieces to give their dies amazing dimension and I had a delightful time dressing up my bottle and filling my elegant champagne glasses with cider that literally sparkles.  

In the beginning. I planned to add hanging vines in the right corner of my card, but I found this 5 x 7 embossing folder with the swirls in the corner and decided to stick with a more clean, elegant look.  I pulled out all the stops where glitter was concerned and even added gem swirls coming out of my glasses to accentuate the bubbles.  

This card might be a little fancy for a masculine valentine card, but my hubby understands my need to bling, so I think he'll overlook the zhuzh and appreciate it for its festive attitude.

I hope the ones you love are lined up to give you smooches on Valentines day, bearing heartfelt gifts of adoration and cheer..and, of course,  a bit of sparkle.  

Thursday, August 17, 2023

Conie Fong Susie Sunshine Digi Card - Cricut Design Space

If it doesn't feed your soul, let it go. 


Hey there from Nannyland,


What better way to convey love and caring thoughts across the miles than by sending a lovingly created handmade card displaying a beautiful soulful-eyed image like this one from Conie Fong Art.  This sweet bouquet-toting lady is called Susie Sunshine and you can find her in Conie's Etsy shop HERE.

I designed the 6 1/2 x 6 1/2 square card in Cricut Design Space using a cut file from the image library called Heart Scallop (#M43611164). It's so easy to use the writing feature to customize sentiments and perfectly position them on a card.  The scalloped heart layer is cut from red foil card stock and the scallops are embellished with white pearl gems. The white cardstock panel is dry embossed with a dot pattern and edged with a silver leafing pen, along with the blue base panel.  The pretty bow that comes with the heart image set is embellished with a red glitter acrylic heart, white die cut mini bow and blue gem.  I sized my image in Microsoft Word and downloaded it from my computer onto Xpressit blending paper. It was a delight to bring this adorable image to life with Copic markers, fussy cut her and then adhere her to my background with mounting tape.  

I'm excited to send this card to a friend who is going through a rough patch right now.  I wish I could be there to comfort her in person but I hope some handmade love will make her burden a little lighter. Have I inspired you to make and send a card to someone who could really use a little dose of handmade love?

Thanks for visiting Nannyland.

Thursday, February 9, 2023

Princess and Frog Z-fold Valentine - Vera Lane Kiss the Frog Digis

The only way to get what you want in this world is through hard work.
Tiana, the Princess and the Frog


Hey there from Nannyland,

I had the best time creating this quirky Valentine card for my wonderful soul mate of 50+ years.  Vera Lane's charmingly whimsical images just crack me up every time I use them.  Since guy cards are often a challenge for me, what with my girlie style and all, these unique images allow me to keep my fussy elements, but in a humorous, lighthearted way.  

I printed my elegant Kiss the Frog digital stamps on Xpressit blending card at 4 x 6 and colored them with Copic makers.  I knew it would be a little tricky to fit these larger images on the same card,  so my favorite Z-fold box card was the answer.  I lengthened the height to 5 inches and cut the base and layering panels out with my Cricut Maker.  I used the Cricut writing feature to create my sentiment. The closed card measures 5 x 7. 


My flowery meadow background scene is digital paper and my blooming tree is from the Cricut image library.  I gave myself permission to glam up my royal couple with all the regalia their status deserves.  I paper pieced my princess dress with a sweet, floral print and added a sparkly gem necklace.  I used colored pencils to create a plaid design for the frog's necktie.  The princess, frog, crowns nnd necktie are all adhered to the card with mounting tape for dimension.  Gems and pearls were added generously to add to the splendor of my majestic scene. 

I think my hubby will get a kick out of this very realistic depiction of our extraordinary relationship. I hope I have inspired you to add a little whimsy to your Valentines this year.  Go forth and create a chuckle for yourself and someone you love.

Thanks for visiting Nannyland.
I'll just be here blissfully creating until your next visit. 
Nancy (aka Pink Panoply)
Playing along with:

Thursday, February 2, 2023

Painterly Wishes - Spellbinders Artful Brush Dies

 You can't go back and change the beginning
but you can start where you are and change the ending.
C.S. Lewis


Hey there from Nannyland,

I always love the calm and serenity I experience with Copic coloring, but sometimes manipulating die cuts to create a colorful composition is the best way to bring calm to my unsettled soul.  Systematically arranging, attaching and embellishing are so satisfying and soothing. That was the case when I created these frilly paintbrush cards as I go through  testing and await some concerning medical results for the next couple of weeks. I love retreating into the safety of Nannyland to feel the unencumbered joy of creating and I always find the tranquility I seek here. 


These whimsical paintbrush dies are from Spellbinders and come in sets with large and small sizes and a variety of accessories to decorate them. I die cut the ferrules and handle tips in silver foil card stock and the wood embossed handles in white card stock. I used a fun drippy paint blob to embellish this paint brush, along with Heartfelt Creations handmade flowers, silver and purple punched swirls and leaves, and a silver layered butterfly that came with the set.  


Here I used the same embellishments and added some Copic coloring to the paint bristles

The size of the paint brushes perfectly fit into the stitched frames I used to create my slimline cards. I used Hero Arts stamps and dies to create the sentiments.  The Create Art sentiment was created in Cricut Design Space. 

I hope I have inspired you to assemble some beautiful art with your favorite dies.  Go forth and organized them into a beautiful masterpiece! 

Thursday, January 19, 2023

Conie Fong January Design Team Project #2 - Susie Snowflake Valentine

 “Being soaked alone is cold. Being soaked with your best friend is an adventure.”
 Emily Wing Smith


 Hey there from Nannyland,

I'm snuggled here in Nannyland while the crazy weird weather around me fluctuates. I hope you're finding solace from the inclement, and sometimes brutal weather that seems to be affecting everyone this winter. My prayers go out to those who have had to endure hardships and losses as a result of violent storms.

Here in my warm hideaway, I am blessed to be blissfully working on  Design Team projects and have chosen to color this gorgeous Susie Snowflake digital stamp for my 2nd DT project this month.  You can find many more fabulous Conie Fong images in Conie's Etsy Shop here.

I chose a large 5 x 7 lacy Spellbinders frame die to mimic swirls of snow surrounding my stylishly bundled-up lady.  I added tiny multicolored die cut hearts to her beanie to create a Valentine vibe.  I adhered enamel hearts to the corners of my frame and a pearl heart to the snowflake she is displaying to complete the Valentine theme. I used small button brads and a white gel pen for detailing. The background panel is lavender glitter paper edged with a silver leafing pen. The curved sentiment was created in Cricut Design Space,  and also edged with a silver leafing pen. 

I hope you have a cozy place,  away from the blustery outdoors,  where you can create a warm greeting for someone you love...and maybe read and watch a movie or six. 

Thanks for visiting Nannyland.
I'll just be here blissfully creating until your next visit. 
Nancy (aka Pink Panoply)
Playing along with:

Wednesday, January 4, 2023

Conie Fong January Design Team Project #1 - Penguin Bundle of Love Box Card


Valentine's Day is precisely what the spirit needs.  It is hot chocolate for the soul.
It is a bright splash of color on a stark white canvas.
The day reminds us to reaffirm our love, or perhaps to give voice
 to that which has remained unsaid.    Dorothy Denneen Volo


Hey there from Nannyland,

I hope you all had a fabulous holiday season, as I did, and are getting excited to create some heartfelt cards  full of mushy sentiments to express your devotion to your tribe on Valentines day.  I enjoy switching gears and creating all things love-related when the holiday season winds down. When I lived in California, it never occured to me to  put a wintery bundled-up penguin on a Valentine card.  But now that I live in a cooler climate,  it makes sense that penguins and snowmen should still hang around in the chilly, snowy months of February and March to help us celebrate the season of l'amour.   

Conie Fong Penguin Bundle of Love digi, Copic markers, Lori Whitlock card base,Cricut Maker,
pink heart gems, glitter heart acrylic stickers, white gel pen, stitched die for snow, patterned paper


I can't imagine a cuter messenger of love than this little "Penguin Bundle of Love" digital stamp from Conie Fong.  You can find her/him in Conie Fong's Etsy shop here.  After I  colored her with Copic markers,  I fussy cut her and adhered her to the front panel of my pop-up box card.  The Z-fold base is a Lori Whitlock svg that I have saved in Cricut Design Space and have used many times to make Valentine cards.  The cute pop-up hearts in the middle sparkle with pink gems and glitter sticker hearts. I covered my card panels with coordinating patterned paper and used the writing feature in Cricut Design Space to create the sentiment tags. I die cut a stitched die to create the dimension for the snow on the bottom panels and lined each panel with a silver leafing pen.  I used a white gel pen to add dots to the hearts and a green fine liner to create the stripes on the large heart. 

I'll be using  more of Conie's incredible images for my Valentine's cards this year.  You will find tons of them in Conie's Etsy Shop here.  I would love for you to stop by and see what else I've created. I hope I have inspired you to incorporate some cute winter images into your Valentine cards this year. 

Wednesday, December 28, 2022

Dreaming Tree Anniversary Card

A good marriage is one where each partner secretly suspects they got the better deal. 


Hey there from Nannyland, 

On the list of life's most momentous occasions, a 50th Wedding Anniversary has to be right up there among the most notable.  My husband and I will celebrate our 55th this year and are thrilled to be among the blessed 5% who reach the 50-year milestone.  Our dear friends are planning to celebrate their 50th next month by taking a sentimental trip to the California beach city where their marriage saga began. We were lucky to join in the merriment on their actual anniversary in December by cooking them a special dinner and gifting them a handmade quilt for their RV. (I'll post the quilt in a future post.)  

I knew this Dreaming Tree SVG would be perfect for a special Anniversary card.  The elegant couple are originally cut as silhouettes but I summoned up the courage to draw faces on them and I'm happy with my attempt.  I won't win any art awards, but both of the recipients are artists themselves,  so I knew they would appreciate my effort.  I paper pieced the wedding dress with gold and white glittered cardstock and found some marblish looking paper for the garden wall. I chose moon and sky digital papers for the background in my digi library.  The leftover flowers were colored with Copics, embellished with gems  and attached to the tree. I also added mini flowers with  pearl accents to my lady's dress and hair, and some tiny dots of white Nuvo Drops to her sleeve.   


The inside of the card cuts a circle and frame to add a photo.  I printed the sentiment in Cricut Design Space.


The original dies look beautiful with just the silhouettes if drawing faces isn't your thing.

Our friends loved their card and appreciated the effort that went into creating it.  I hope this inspires you to use your die cuts in new ways and create something unique for a special occasion.

Thanks for visiting Nannyland.
I'll just be here blissfully creating until your next visit. 
Nancy (aka Pink Panoply)
Playing along with:

Tuesday, February 15, 2022

Valentine Travel Journal - Graphic 45 Mix Media

 Love is our true destiny.  We do not find the meaning of life by ourselves alone - 
 we find it with another.  Thomas Merton


Hey there from Nannyland,

Mixed media is one of those artistic expressions I absolutely love but really don't have much of an aptitude  for.  My precise brain just doesn't know how to playfully arrange elements in a loose, relaxed manner, no matter how hard I try.  I think that's the problem...I try too hard!


When my friend purged her studio and asked me if I wanted this fabulous Graphic 45 Journal Kit full of  travel ephemera and detailed instructions, I jumped at the chance to be guided through this jungle of lovely vintage embellishments. I completely relished the process, but something got in the way and the project ended up in my "to finish" box, which is usually neglected and sometimes forgotten. 


Then one day when I was working on some vintage tags on a whim, I came across my abandoned journal and knew it would be a perfect Valentine "card" for my hubby.  The travel theme and neutral colors were perfect to display pictures of us in all stages of our marriage, enjoying our many treasured travel adventures.  


It didn't take me long to print enough pictures to fill many of the pages and tags. Each picture brings back sweet memories and reminds me of our rich, vibrant 53+ years together.  There are plenty of spaces waiting for pictures of sagas yet to come.   


The pretty tags are ready to document the details of our adventures, but that is a task for another day.  It will be fun reminiscing with my sweetheart about the specifics of our odysseys together. 


He was so impressed with all the work I'd done and we had fun walking down memory lane, reliving some of the most cherished moments in our marriage.


I did confess to him that I had done most of the hard work on this journal years before. I think it was just waiting for the right moment to shine forth and celebrate our marriage with a panoply of exquisite memories.

I hope you had a fabulous Valentine's Day with the people you adore.

 
Thanks for visiting Nannyland.
I'll just be here blissfully creating until your next visit.  
Nancy (aka Pink Panoply

Thursday, February 10, 2022

Queen of Hearts - Mayumi Ogihara Digi

 Your crown has been bought and paid for.  Put it on your head and wear it. 
Maya Angelou


Mayumi Ogihara digital image, Copic markers, gold and red glitter card stock, gold gems,
 Cricut cutting and writing features, white gel pen, gold leafing pen, Xpressit blending paper

Hey there from Nannyland, 

I've been so busy with life lately that I haven't had much time to color and create, and I've been  missing my calm relaxing respites.  I finally had a few minutes to breathe and picked up this gorgeous Mayumi Ogihara digi that I've had on my desk for a while in anticipation of Valentines Day.  My Pink Panoply brand has a crown  on it and my craft room is packed with all kinds of regal paraphernalia, so when this lovely lady asked for an audience,  I had to answer her with some coloring time.  I love her pensive expression...she looks like she is surveying her kingdom and thinking how utterly marvelous it is to be Queen (or maybe who might be the next to lose their head).     

 I don't often color greyscale images because I find it hard to color over the shaded areas without the gray showing through and I can't get the contrast I want.  I love using bright colors, but it really isn't possible on the darker areas.  Covering the gray with flesh tones is also a challenge.  But the end product has lots of dimension and realism, so I'm always happy with the result.    

I used deep red Copics for her dress and added definition with a white gel pen and gold gems.  I added a few red highlights with Prisma Colors to her luxurious blond tresses.  The heart frame was cut on my Cricut in gold and red glitter card stock.  I used the Cricut writing feature to print and cut the sentiment.  The main panel and sentiment tag are edged with a gold leafing pen.   The crown is so dark that I couldn't get much definition with the Copics so I used some gems to create the base. It makes me smile a little because it's a bit silly, but she IS the Queen after all.  

In the end, the colors are a little muted for me, but I think this card will be perfect for one of my friends who fancies herself as a princess. 

Friday, January 28, 2022

An Apron Full of Love For Valentines Day - Make It Crafty Digital Stamp

The secret to living well and longer is: eat half, walk double, laugh triple and 
love without measure.
Tibetan Proverb


Hey there from Nannyland,

I 💔 the season of amour and enjoy creating and sending heartfelt love notes to those who make my world a delightful place.  I think this "Marcy's Full of Love" digital image from Make it Crafty, with her apron brimming with hearts, is so sweet.  Her darling pose is perfect for the right panel of this side step card next to a big gushy Valentine message. 


I used my favorite Copic shades to color my image and chose several light BG colors to create a shadow around her. When I have a small image like this, I enjoy coloring multiples because I can zone a little and savor the practice! I borrowed the side step card base and scalloped panels from this Lori Whitlock Valentine card bundle and cut them out in Cricut Design Space.  I used the writing feature to create the sentiment on the left panel. All the layers are edged with a gold leafing pen and the hearts on the image are glittered with Stickles. I added a sparkly acrylic heart and some tiny red heart gems for a little more glitz.  


I made three of these cards and now I'm ready to move on to the next happy project.  Whew! Valentines Day will be upon me before I know it so I'd better hop to it!

Thanks for visiting Nannyland.
I'll just be here blissfully creating until your next visit.  
Nancy (aka Pink Panoply

Playing along with: