Showing posts with label Sizzix. Show all posts

Friday, August 9, 2019

Sending Hugs - Conie Fong Moonflower Lullaby Digi


Act as if what you do makes a difference.  It does.
William James


Copic makers, Spellbinders frame, Sizzix sentiment stamp and die, white gel pen,
white glitter card stock, gold matte card stock, magenta card stock


Hey friends,

One of the fringe benefits of being a card maker is the pleasure of sending hugs by snail mail to anyone I want, any time I want, and imagining  they can actually feel my handmade love radiating from the envelope.  I thought this hugably adorable Conie Fong image was perfect to carry my message of affection.

My image is mounted on a square Spellbinders frame with some pretty heart cutouts in the design and, even though most of them are hidden,  this glittery white frame adds some shine to my moonflower lady.  I used matte gold card stock for the narrow frames around my images  instead of my usual glossy gold card stock and I like the subtle sheen.  I die cut a smaller matching frame and oval  out of white craft foam to mount my layers for dimension. I've been choosing this over pop dots lately because it keeps my card smooth for mailing and it looks a little more polished.

The small flower centers are embellished with Elizabeth Crafts peel off glitter dots.  I love these so much, but often forget to use them.  They are subtle, but add just the right pop of sparkle. I added dots to my flowers with a white gel pen, attached some pretty dimensional heart stickers to the sentiment and now I'm ready to post my handcrafted happy mail.

Thanks for visiting.
Go forth and post some handmade hugs.
Nancy

Playing along with:
        Brown Sugar Challenge #292
        Polkadoodle Challenge Wk 32
        Simply Create Too Challenge #152
        Craft Rocket Challenge #62
        Crafting With an Attitude Challenge #54
        Crafty Creations Challenge #395
        Creative Moments #174
        Penny's Challenge #442

Monday, July 8, 2019

Colours of the Rainbow - Try it On Tuesday Guest Designer

Someday we'll find it, the Rainbow Connection, the lovers, the dreamers and me.  

Kermit the Frog


Mo Manning digi, fence die, leaf die, flower punch, butterfly die, colored gems, copic markers,
white gel pen, dp paper (background), computer generated sentiment (Pinterest)
Hey friends,

I'm extremely honored and excited to be a Guest Designer for the "Colours of the Rainbow" Challenge at

Try it on Tuesday
They're definitely one of my favorite challenges and this theme is right up my alley,  as a glimpse of my blog will attest. I have been dying to color this darling Mo Manning image of Cinderella's "less attractive" step sisters, and I thought they would be perfect for this card about letting your wacky self shine.  I did have to alter their faces a bit because the original image made them look a little angry.  I wanted them to look more quirky than mean, so I gave them some cute crooked smiles. And, of course, their sassy outfits had to fit their vibrant personalities.


This z-fold card base is one of my favorites because it has so much real estate to play with.  I tried creating it in Cricut Design Space but I just couldn't seem to get the measurements  right for the folds.   I realized it was much easier just to measure and score the folds by hand.  The finished card measures 5 1/2 x 5 1/2 and fits in a standard square envelope.

The sentiment on this card says it all.  As those of us with a creative tilt know, life would certainly be boring without the full spectrum of all things bright and  beautiful, both in nature and in people.  

Thanks for visiting.
Go forth and create something colorful.
Nancy

Playing along with:


Friday, July 5, 2019

Appliqued Bib and Burp Cloth Sets

“If I am thinking correctly,” said Pooh, “a new baby is probably, 
undoubtedly the grandest gift that could ever be.”


Hey Friends,

I've been extremely delighted about my hubby's pastrami passion for the past few months, because it means we get to go to my favorite sandwich hangout, La Bou, at least once a week.  A darling sweet young server there has taken a liking to us...well, mostly my pastrami-obsessed husband... and makes sure we always get the best service, complete with bucket loads of meat on our sandwiches.  She has even been known to push other servers out of the way so she can make our sandwiches the "right" way.

During our last visit, we noticed she might be a little pregnant.  Apparently she has been hiding it well for the past few months because she had the audacity to announce she would be going on maternity leave the very next day. How dare she!!! We said our sad goodbyes and managed to keep our despair in check until we got to our car.


When we regained our composure, we decided we wanted to give her a little gift to tell her how much we have appreciated her kind indulgence, and I knew I had some fun handmade baby items left over from my Etsy shop days.  It's nice to have my own little store to shop in when I need a small baby gift. I tucked  the bee set into a fancy bag along with a matching card and we presented it to her the next day.

 A few years ago, I bought several adorable applique images from Etsy to make these sets. I had such a good time embroidering them on my pieced bibs and burp cloths. You can see some other bibs herehere, and here  with a little more detail on earlier blogs.  I don't think I''ll be making these exact same sets again because I have some fabulous  new Accuquilt dies  that will make cutting the patterns so much simpler.  I wanted to immortalize these on my blog before they find homes with some adorable little droolers in the near future.

Our server friend is having a little girl so I hope she thinks of us when she puts the  bib on her sweet little one.  And, selfishly, I hope she comes back soon because we're sure going to miss her smile and her awesome sandwich making skills. But for now, I'm content thinking of a sweet little cheek on my lovingly handmade burp cloth.

Thanks for visiting,
Go forth and kiss a baby cheek.
Nancy

Saturday, June 29, 2019

A Dress For All Occasions - Dreaming Tree Darling Dress SVG

Now and then it's good to pause in our pursuit of happiness and just be happy.
Guillaume Apollinaire

Dreaming Tree SVG, Circuit, Sizzix layered sentiments and dies, DP paper pad, rhinestones, satin bow,
 gold and silver leafing pen

Hey friends,

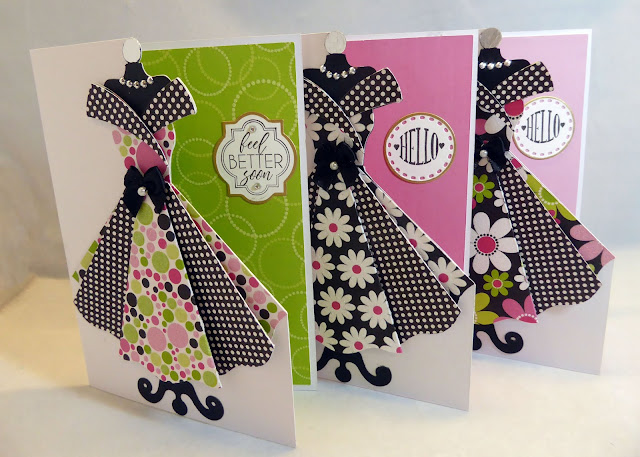
I've seen this darling dress card everywhere on the Dreaming Tree Face Book page and now I know what all the fuss is about. This design is so clever and fun to cut and assemble, it seems no one can make just one card. I couldn't wait to download the SVG from the Dreaming Tree Website, dust off an older 12 x 12 scrapbook paper pad and go to town cutting bright bold prints for this super snazzy dress on my Cricut Explore Air 2.  Before I knew it, I had whipped up  nine cards in a flash.

These fancy frocks were delightful to embellish with satin bows, pearls and rhinestone jewelry. I was congratulating myself for creating such a hefty stockpile of  generic cards when I realized I would be mailing at least five of them right away...three to friends I haven't checked in with for a while, one to my dear friend who has just finished radiation treatment for cancer and another young lady who is undergoing surgery for thyroid cancer as I write this post. I'm so glad my creative outlet affords me such a personal way to express my love and concern to my friends.  


I'll still have a few left for thank you's, and birthdays, but I'll have get busy designing more of these chic dresses using different patterns and embellies. SO MUCH FUN!

I have this pattern all set up in Cricut Design Space so I can whip up a batch in no time, just  like baking cookies...only much more fun  (and kinder to the hips.) 

Thanks for visiting.
Go forth and create something fabulous.
Nancy

Playing along with:

        Crafty Catz Challenge #468
        Daring Cardmakers - Cut It Up
        Aud Sentiments Challenge #230
        CardZ 4 Galz - Challenge #99 - Favorite Color Combo
        Crafty Gals Corner Challenge #194
        The Sisterhood of Crafters - Any Occasion
        Paper Craft Crew Challenge #342
     

Saturday, December 22, 2018

Snowflake Fold and Flip Christmas Card - Sizzix Thinlits Die Set

Like snowflakes, we are all beautiful in our own way.


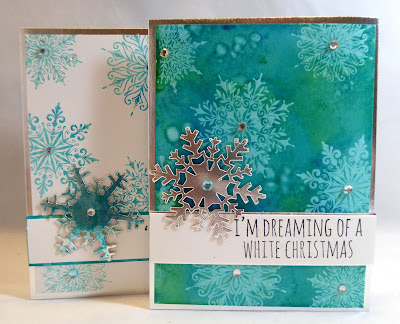
A group of my talented crafting buddies meet once a month to do parchment craft cards and I  hate to admit it, but I'm a Pergamano dropout.  I have all the tools from classes we took together, but I just can't seem to commit myself to all the hours it takes to complete these gorgeous projects.  So when I needed a card to make for these ladies for our annual Christmas lunch, I wanted something fancy and lacy, without having to take my tools out and struggle through a parchment project.


My friends would have appreciated any handmade card I chose to make, but I was surprised and delighted when I found this Sizzix Christmas snowflake thinlits die set in my stash from years gone by!  The center die cut images are meant to create a completed fold and flip card,  but I chose to mount the assembled card on my usual a 5 x 7 card stock base.  I used white and two shades of blue glitter card stock for my die cuts. Rhinestones were added to my snow flakes for added sparkle.  My white front panel needed some texture, so I embossed a chevron design to mimic some of the snowflake geometric designs.

The pretty layered snowflake opens up to reveal some die cut seasonal words in glossy silver.  Noel was included in the set, but I chose to use just the other three die cut words. 

Best of all, this card is a two-fer.  When the snowflake is opened on the front of the card, a beautiful message is revealed and then I get another opportunity  for a sentiment on the inside of the card.  Lot's of convenient card real-estate for sending good wishes.

Speaking of good wishes, I wish you all a very Merry Christmas and a blessed 2019.

Thanks for visiting.
Go forth and create something fabulous.
Nancy 

Playing along with:


Sunday, August 12, 2018

Christmas In July - Richele Christensen Class in Dixon, CA


Hi everyone,

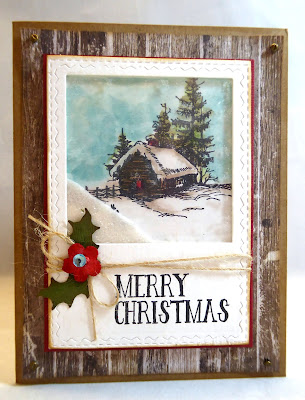
A group of my besties and I had the privilege of attending Richele Christensen's "Christmas in July" class recently in Dixon, CA.  She is an absolutely brilliant designer for Sizzix and Tim Holtz. But best of all, she is a dear friend who started her impressive career teaching classes at the Stamp Art Shoppe near where I live.  Her loyal groupies, of which I am a proud member, love it when her busy teaching schedule includes a class  in our neck of the woods.  This gorgeous snowy  woodland scene is my favorite of the cards we made. We used the Sizzix Paper Snowflakes Thinlets, Stitched Oval Thinlets and Woodlands Thinlets for this card.


My plan is always to get my Christmas cards done way before the holidays to relieve my holiday crafting stress but, thus far, that dream has never materialized.  This year, Richele's class has put me in the mood to get my creative juices flowing with Christmas spirit early and, after this inspiring class,  I think I'm already hearing some distant jingle bells. A Stacked Baroque Thinlit and Retro Merry Christmas was used here.


We made these two cards using Tim Holtz Lift Ink on a alcohol ink and Yupo  background.  Jennifer Mcguire shows how it's done in this video.  You really have to try this fascinating twofer process.  Stampers Anonymous Mini Swirl Snowflakes were used for the stamping.


I've made several shaker cards in the past with mixed results, so I tend to avoid them since the tiny bits seem to stick to places where they don't belong.  Somehow this card seemed easier to accomplish with Richele holding our hands.  However, fifty of them might be a little daunting, so I'll save this one for someone special. The winter scene stamp is from Stampers Anonymous.


Festive gift card holders were fast and easy using the Sizzix Gift Card Bag Thinlets.   

I learned some interesting new techniques in this enjoyable class and I love every card we made. You'll find Richele to be one of your favorite instructors if you are ever lucky enough to take one of her amazing classes.

Thanks for visiting.
Go forth and create something fabulous.
Nancy


Monday, April 9, 2018

Silvery Floral Natalie - Prima Princess Stamp


👉 Happiness radiates like the fragrance from a flower and draws all good things towards you. 


Hey there,

I just discovered these amazing Prima Princess stamps and I'm positively hooked.  I already have seven of these lovely ladies and I'm not going to stop until I have the whole collection.  They're absolute heaven to color with any color medium but, of course, I choose copics. This bewitching lady is called Natalie. I colored her gorgeous locks blue, just like they were on the package she came in, because I would never have thought to color them that way myself and I love the look.

The stamps are big and are meant for larger cards (5 x 7ish) so I needed a frame large enough to showcase the whole image. I found this notched frame in Cricut Design Studio and I did end up cutting her down a bit to fit, but I like the way she fills the frame.  My embossed silver metallic frame is okay, but I think it's a little overwhelming and distracting for my image.  I'm going to use this same design for another image, but next time I will use softer colors to frame her and some soft paper flowers for more texture and interest, maybe even adding some to her hair.

I have several of these marvelous Prima Princesses already stamped with Memento Tuxedo Black ink just waiting to be changed from black and white to copically brilliant!  I'd love for you to visit again and see what I come up with.

This is what I used:

       This Prima Princess stamp
       Elizabeth Crafts leaf and flower dies
       Eliabeth Crafts green Mylar Shimmer Sheets for leaves
       Silver metallic card stock
       Sizzix large embossing folder
       Copic Markers
       Mounting tape for frame
       Notched frame sized to 5 x 7 in Cricut Design Studio
       Memento Tuxedo Black Ink


Thanks for dropping by.
Go forth and create something fabulous.
Nancy 

Playing along with:
        4 Crafty Chicks
        Just Us Girls
        Incy Wincy Designs


Wednesday, February 7, 2018

Galentine for my besties - Copic colored Art Impressions Image

👉 Life is better when you're laughing.


Hey there,

Quilts, friends, cardmaking, holidays...these are a few of my favorite things!  I thought this adorable Art Impressions image was the perfect way to tell my friends how much I treasure them this Valentines day. These ladies are some of the loveliest, most talented and inspiring women I know and I appreciate any chance I get to thank them for their support and love. Since they know I adore everything quilts, they'll know this card comes from my heart.  


This sentiment is such a clever play on words and, of course, we know it takes a block of friends (kind of like a village) to help us navigate through this "crazy quilt of life."  I was excited to find this bright colored sewing themed DP in my stash to embellish my die cut card base. The background layer dies were included with the set, along with several other fun embellishments that I'll use on another card.  

Here's what I used:
  1. This Sizzix 5 x 7 Framelits die set.
  2. Art Impressions stamp 
  3. Copic Markers
  4. Friends die (not sure what brand)
  5. Tonic Studio Nuvo drops - Red, Blue
  6. Rick rack trim
  7. Computer generated inside sentiment.
Thanks for visiting.
Go forth and create something fabulous.
Nancy

Playing along with:
        Always Fun Challenges
        Crafting From the Heart
        Pammies Inky Pinkies Challenge
        The Paper Nest Dolls Challenge
        Creative With Stamps
        Fab and Funky Challenge
        Just Us Girls

Saturday, February 3, 2018

Zebra Valentine in Cricut Design Space - Lori Whitlock Flip Flap svg

👉 Creativity is contagious.  Pass it on.    Albert Einstein


Hey there,

This looks like a cutesy card for a small kiddo, doesn't it?  Well, no...actually, this is a Valentine for my 30-something daughter. My husband and I and our two grown daughters are quite a silly group and I'm pretty sure my daughter will be delighted with this fancy zebra telling her how "fab" she is.  Maybe it's because I don't have grand-kids (meh), but I often send my friends and adult family members cards with fun juvenile-ish images because they are fresh and darling and they make me smile.


Of course I had to fancy up my card to impress my mature recipient, so I took advantage of a Lori Whitlock Flip Flap Card svg.  I love these flappy cards because there are tons of options for adding pictures and sentiments.  I would normally have left the panel on the inside of this card blank for a note, but I couldn't resist adding this with little tree with the hearts on the truck that I found in Cricut Design Space.  All of the images here were "free"with my monthly subscription to Cricut Design Space.  All the layers for the card were included in the Lori Whitlock svg file.

Here's what I used:
  1.  This Lori Whitlock file.
  2. Create a Creature Cartridge in Cricut Design Space for zebra.
  3. Writing function in Design Space for sentiments - it's easy...try it!
  4. Tree, grass and fab sentiment - miscellaneous Design Space files.
  5. Tiny flowers - Impression Obsession die.  Sun die (don't know the brand)
  6. Assorted card stock
  7. Dot embossing folder for tree.
  8. Small rhinestone for Zebra's flower.
I had a delightful time making similar cards for my other daughter and husband.   I'll be posting them soon.

Thanks for visiting.
Go forth and creative something fabulous.
Nancy

Playing along with:
        Animal Friends Challenge
        Creative Moments
        Make My Monday
        Scrapy Land
        Crafty Gals Corner

Sunday, October 29, 2017

More Sizzix Bell Jar Cards - Christmas


In a recent post, Tim Holtz Halloween Bell Jar cards, I showed you some super fun Halloween cards I created in a Sandy Brien class at the Stamp Art Shoppe last fall.  Here are some more amazing holiday cards created in the same class. Sandy's card designs are always so beautiful and having her as an instructor is such a treat.


I remember being delighted with how these cards turned out and thinking I would make some for other occasions during the year.  Well, it's a year later and let's just say I'm glad I saved the directions. 

Want to create some of these darling holiday scenes for yourself?  Here's some of the things we used.

        Card Base: 10" x 7"
        Large Layer (Patterned Paper) 4 3/4 x 6 3/4
        Small Layer (Solid) 4 1/4 " x 6  1/4"
        Design Layer: 4" x 6"
        Cardstock for scene die cuts
        Transparency scrap for Bell Jar
        Sentiment stamps
        Sizzix Bell Jar die 658244
        Christmas dies from Impression Obsession and Memory Box
        White embossing powder
        Versamark pen
        Distress Inks
        Gems, stickers

The snow on the pine trees is made by inking the die cut tree with Versamark and then embossing with white embossing powder.

Thanks for visiting.
Go forth and create something fabulous.
Nancy


Thursday, October 12, 2017

Sizzix Tim Holtz Bell Jar Halloween Cards - 2016 Stamp Art Shoppe Class Flashback


While searching through my "Big Box O' Halloween Stuff" for some inspiration and supplies, I was excited to find these fun cards that I made in a class at the Stamp Art Shoppe last year.  Our amazingly talented teacher, Sandy Brien, showed us how to use the Sizzix Bell Jar die with acetate to give a realistic-ish glass jar look.  She instructed us to temporarily center the bell jar transparency on our paper and carefully sponge around the edge with distress ink to make the jar look lighter. We then cleaned and dried the transparency and adhered it to the pedestal after creating our scene.  I had forgotten how cute these cards turned out.  


The ghosts, pumpkins, bats, grass and scene dies are all from Impression Obsession. The leaves were made with punches.  The fabulous bell jar die is Sizzix Bell Jar 658244, which I've seen on Amazon recently.  I have a similar Sizzix Snow Globe die with a Christmas scene that I can't wait to use with this same process. 

Sadly, the Stamp Art Shoppe closed earlier this year, but Sandy still comes to town to teach classes about once a month.  I always look forward to being enlightened by her mad skills and talent.

Thanks for visiting. 
Go forth and be fabulous.
Nancy