Showing posts with label Dreaming Tree SVG. Show all posts

Thursday, June 13, 2024

Dreaming Tree Super Dad SVG - Happy Fathers Day


Dreams save us. Dreams lift us up and transform us. And on my soul, I swear...
until my dream of a world where dignity, honor and justice becomes the reality
we all share --I'll haver stop fighting.       Clark Kent


Hey there from Nannyland, 


My struggle to create guy cards is real, but I have to admit I had a delightful time creating this Father's Day card for my hubby.  I downloaded this fabulous svg from the Dreaming Tree website and had a blast assembling their incredibly clever card.  After cutting the layers on my Cricut Maker, it took only a few minutes to do all the assembly and add a few fun embellishments.  All the pieces in this design fit together seamlessly like a puzzle


I didn't want to bother with messy sponging, so I added a few light shadows with Copics and colored pencils, which are always at the ready on my desk.  I paper pieced the tie because my husband would rather die than be seen in a boring one. The sample on the website had pearl buttons but I drew  small circles with  my pencils instead for a more masculine look...because, of course, the flowered tie and flower in the lapel are so manly. Hey, I was just trying to keep things balanced. I thought of adding a clever sentiment to the belly band, but the Happy Fathers Day was so cute, I went with that.

Creating this super fun card was definitely positive reinforcement to ease my guy card qualms.  I think I'll just keep hopping over to Dreaming Tree for my masculine card designs.  I've seen some really awesome ones I'm dying to try! 

Thanks for visiting Nannyland.
I'll just be here blissfully creating until your next visit.
Nancy (aka Pink Panoply)
                                                                   Playing along with:
Tic Tac Toe Challenge #249 (layers, die cut, patterened paper)

Wednesday, April 10, 2024

Dreaming Tree Fleurette Card with Copic Makers


Like a wildflower, you must allow yourself to grow
in all the places people thought you never would. 


Hey there from Nannyland,


While searching in my Dreaming Tree svg library for a project for my friend's birthday, which resulted in this fun taqueria treat box, I realized that I have tons of beautiful svg's there just vying for my attention.  I found this darling girl called Fleurette and went to work creating a spring card for my daughter's April birthday.  

Dreaming Tree designs are always super clever with lots of incredible details.  This cute girl has many layers which fit together nicely and create amazing dimension.  As a Copic colorist, I prefer to cut the smaller shapes out on white card stock and shade with markers.  In this case, I started by shading the clothes, sun, background flowers, and hair layers. I removed the original cuts for the face in the svg with the contouring feature in Cricut Design Space, to create a smooth surface for me to draw and color her features. I then drew simple facial features with a pencil and shaded the face, neck and arms in flesh tones. I replaced the original flower dies with several small ones from my stash, mostly from my Spellbinders collection.  And, as always, I added small gems and pearls for extra personality and sparkle. 

Nothing is more enjoyable for me than creating with die cuts and zhuzhing them up with Copic coloring and fancy embellishments. I love taking a wonderful design from Dreaming Tree and using my own style to make it uniquely mine.

Thanks for visiting Nannyland.
I'll just be here blissfully creating until your next visit.
Nancy (aka Pink Panoply)
Playing along with:

Friday, March 29, 2024

Dreaming Tree Taqueria Treat Box

I don't mean to brag, but,,, I just put a puzzle together in one day
and the box said 2-4 years. 


Hey there from Nannyland,


I guess it's true...two opposing things can be true at the same time.  I have learned that assembling 3-dimensional objects is definitely not my super power and it is also true that it is exceptionally fun for me. I never would have attempted putting together one of the many amazing Dreaming Tree 3-D items, especially the elaborate buildings, until I created this bird house treat box for my friend's birthday a couple of years ago.  As it turned out, the directions on YouTube were amazingly simple to follow and I ended up with an awesome gift box.  

This year I thought I would try this adorable Taqueria box for the same friend who is obsessed with Mexican food.  I plan to fill it with some yummy homemade chocolate chip cookies again and a gift card from his favorite Mexican restaurant. Turns out, I'm still pretty messy with the gluing and assembling thing, but look how cute it turned out!  My friend is a fabulous artist, but when I gifted him his birdhouse, he was more impressed with how it fit together and less with perfectly lined up edges. So I think he will love figuring out the intricate ins and outs of this clever box.    


The original pattern calls for yellow vellum in the windows, but I didn't have it in my stash so I substituted it for some thin textured paper that works just as well when lit with a tea light.   I made a ton of mistakes but was able fix them in ways that made them look like they were meant to be.  My Cricut blade must have been a little dull or my paper was the wrong weight for some of the intricate pieces.  The Taqueria sign had some tears in it, but I covered them up with a small flower and some surgical piecing.  The small holes in the die cut cactus pots were a mess, so I traced the pot shape on designer paper and filled them in with shiny Glossy Accents.  I mistakenly put glue all over the fancy dome on the roof before I realized it wouldn't actually be glued to the front.  Eeek!!! So I added green card stock backing and glued a star to the opening.  In the end, everything worked out fine,  I had lots of gold gems and stars in my stash, so I put them to good use.                                    . 


The back has a door that closes with Velcro so it is very easy to fill the box with treats, gift cards or whatever other treasures might fit inside. 

Whether I cook a traditional Mexican dinner for my friend and his wife, or we choose to go out for some delicious Mexican food, I can present this unique portable gift box to him with a proud grin on my face, knowing that as an artist himself, he will appreciate all the work and loving thoughts that went into creating it.

Thanks for visiting Nannyland.
I'll just be here blissfully creating until your next visit.
Nancy (aka Pink Panoply)
Playing along with:

Wednesday, December 28, 2022

Dreaming Tree Anniversary Card

A good marriage is one where each partner secretly suspects they got the better deal. 


Hey there from Nannyland, 

On the list of life's most momentous occasions, a 50th Wedding Anniversary has to be right up there among the most notable.  My husband and I will celebrate our 55th this year and are thrilled to be among the blessed 5% who reach the 50-year milestone.  Our dear friends are planning to celebrate their 50th next month by taking a sentimental trip to the California beach city where their marriage saga began. We were lucky to join in the merriment on their actual anniversary in December by cooking them a special dinner and gifting them a handmade quilt for their RV. (I'll post the quilt in a future post.)  

I knew this Dreaming Tree SVG would be perfect for a special Anniversary card.  The elegant couple are originally cut as silhouettes but I summoned up the courage to draw faces on them and I'm happy with my attempt.  I won't win any art awards, but both of the recipients are artists themselves,  so I knew they would appreciate my effort.  I paper pieced the wedding dress with gold and white glittered cardstock and found some marblish looking paper for the garden wall. I chose moon and sky digital papers for the background in my digi library.  The leftover flowers were colored with Copics, embellished with gems  and attached to the tree. I also added mini flowers with  pearl accents to my lady's dress and hair, and some tiny dots of white Nuvo Drops to her sleeve.   


The inside of the card cuts a circle and frame to add a photo.  I printed the sentiment in Cricut Design Space.


The original dies look beautiful with just the silhouettes if drawing faces isn't your thing.

Our friends loved their card and appreciated the effort that went into creating it.  I hope this inspires you to use your die cuts in new ways and create something unique for a special occasion.

Thanks for visiting Nannyland.
I'll just be here blissfully creating until your next visit. 
Nancy (aka Pink Panoply)
Playing along with:

Saturday, May 21, 2022

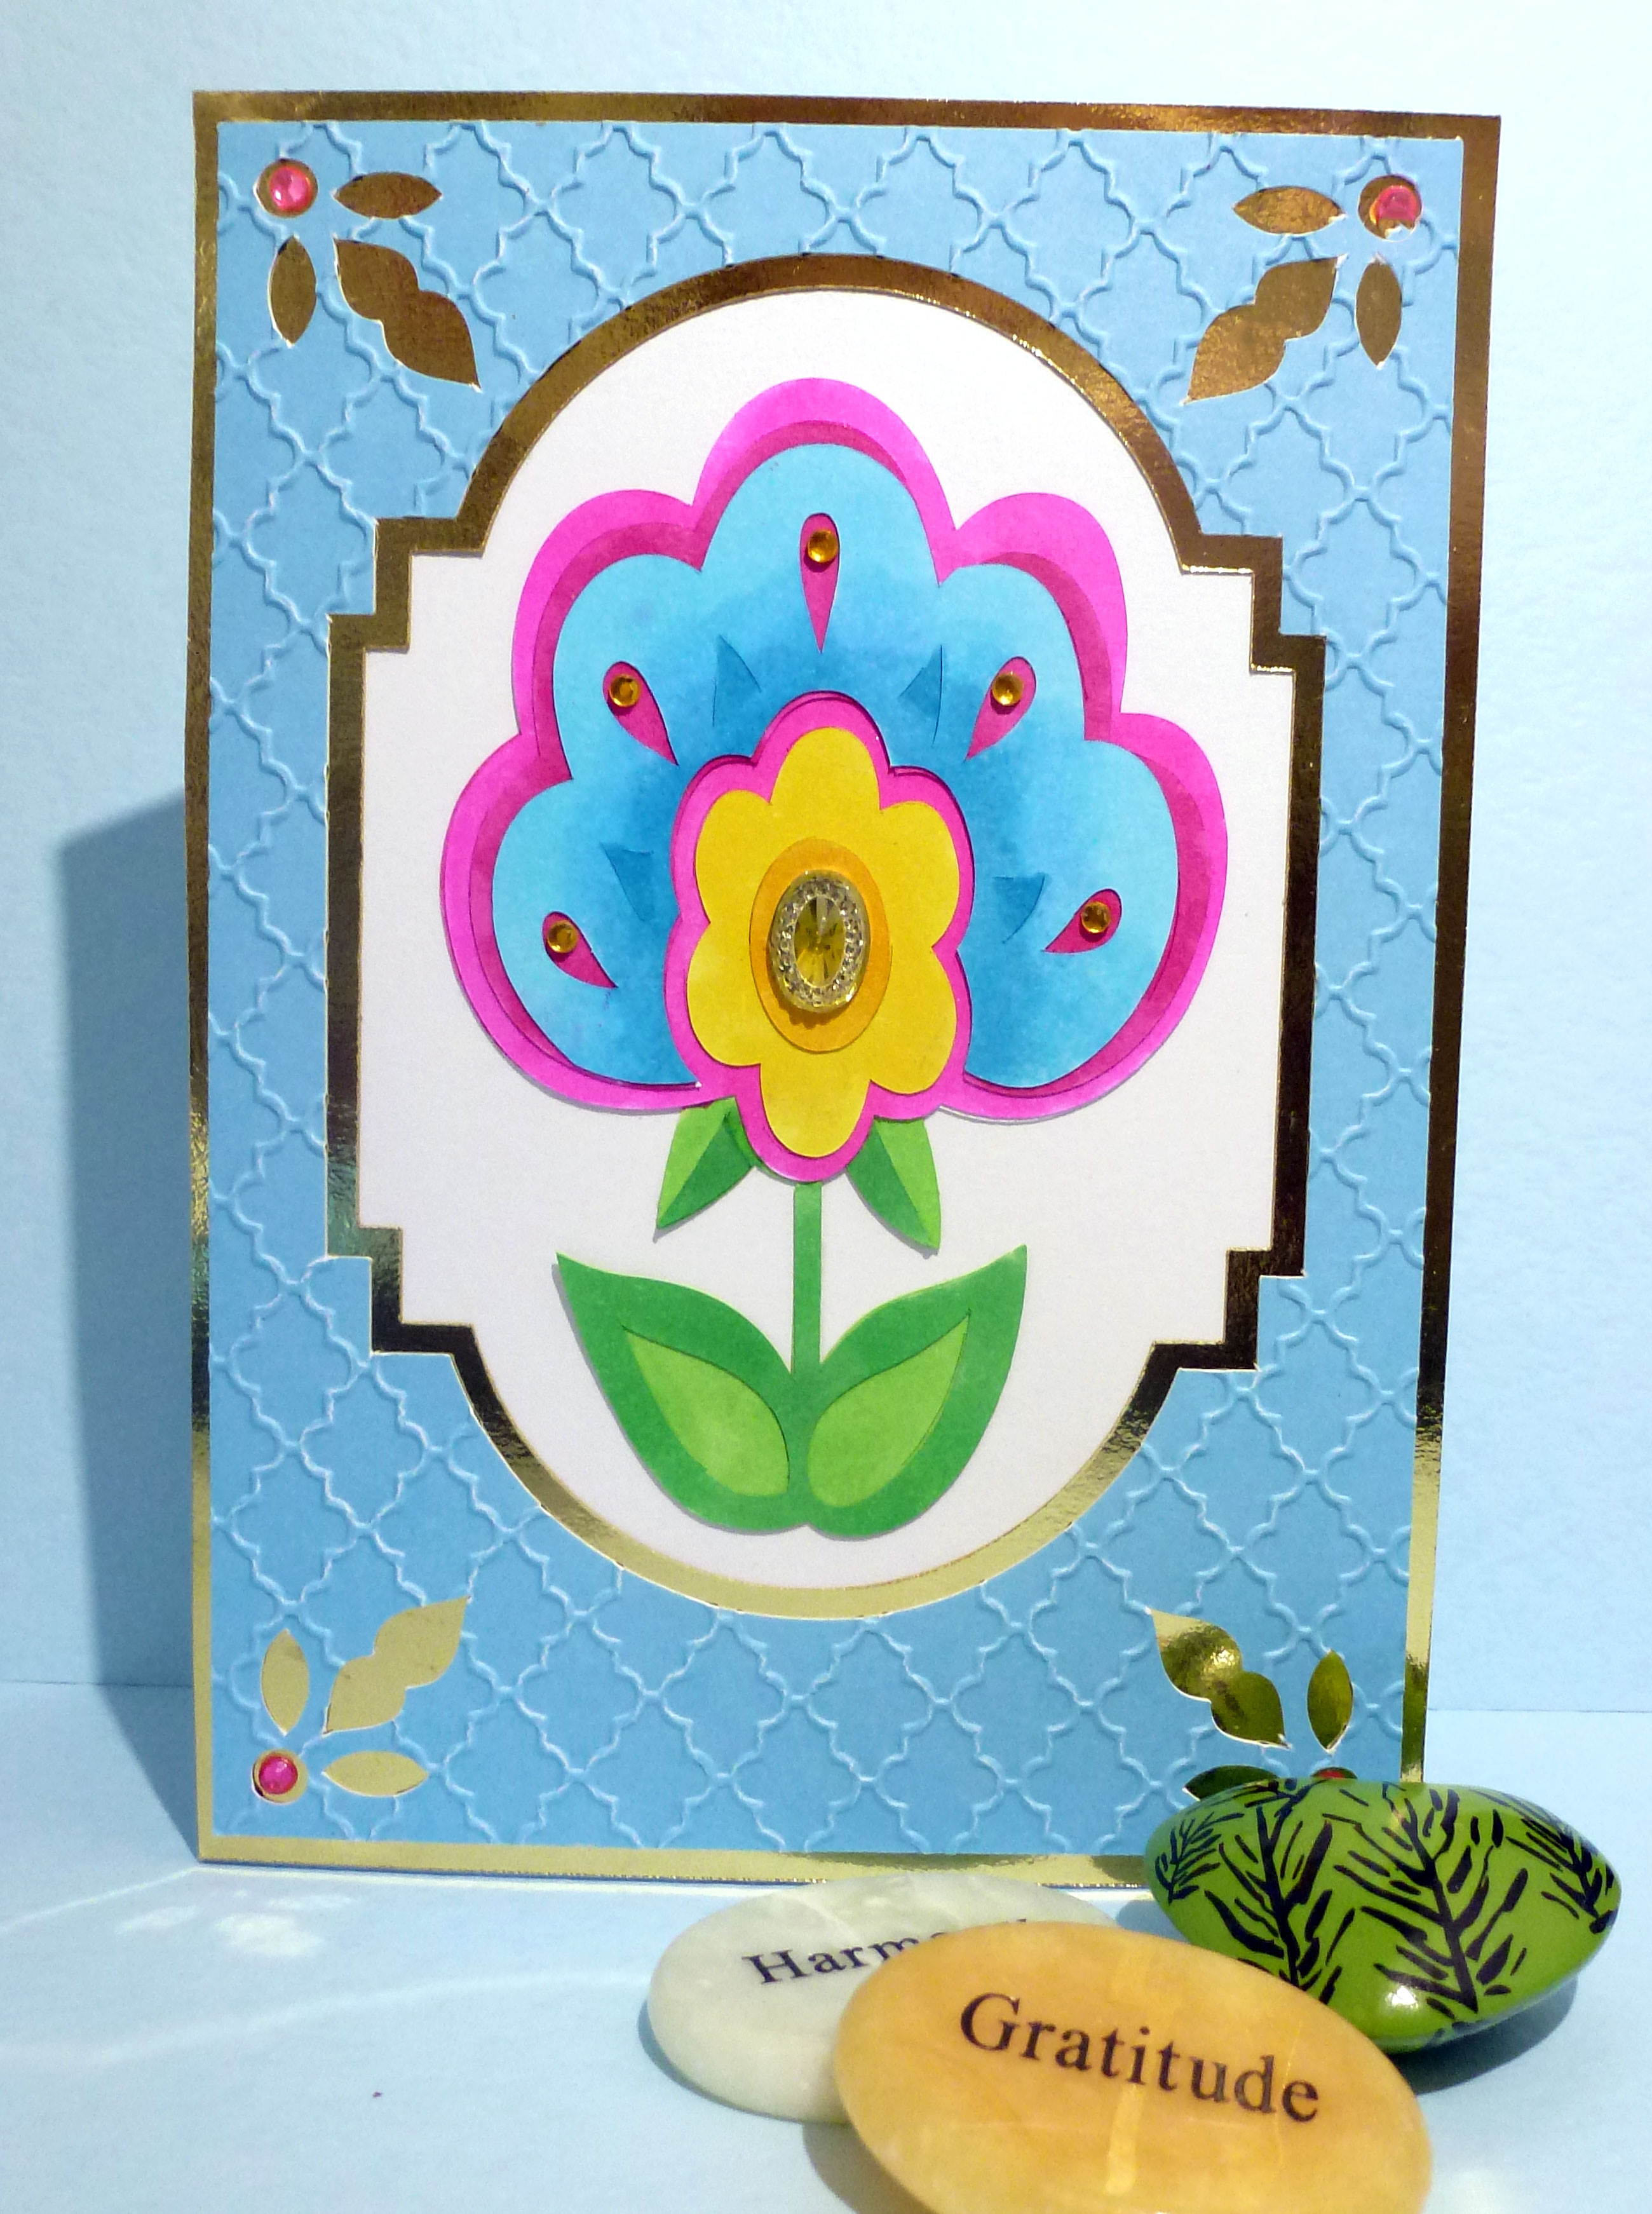
Dreaming Tree Fantasy Flower Cards - Cricut Florals Embellished

 Your story is unique and so, so different...and not worthy of comparison. 


Hey there from Nannyland,

I'm back from a very tranquil and restorative trip to Hawaii and feeling energized to work on some colorful projects inspired by the gorgeous landscapes and flora in one of the most beautiful places on earth. 


My Cricut Maker has been calling to me and I was happy to answer with these cheery 5 x 7 notecards from my Dreaming Tree svg library.  I skipped the wrap-around portion in the design and changed out the flowers for some bright layered flowers from the Florals Embellished image set in the Cricut Library.  


My card base and front panel (which is embossed with the Cuttlebug Decorative Tile embossing folder) are cut from heavy cardstock and the insert is cut from gold foil card stock.  I cut the flower layers in white card stock and colored them with Copic markers.

Dreaming Tree Fantasy Flowers Card svg, Cuttlebug embossing folder,
Cricut Florals Embellished image set, Cricut Maker,
assorted gems, gold foil card stock, colored heavy cardstock


The most enjoyable part of creating these cards was building the flowers and adding sparkle with colored gems.  I'm happy to have some festive all-occasion cards in my stash when I need to send off a quick note and want it to be a little special. 

These were such a relaxing break from my regular copic coloring and card designing. My Cricut always gives me a burst of energy when my mojo needs a boost.

Thanks for visiting Nannyland.
I'll just be here blissfully creating until your next visit.  
Nancy (aka Pink Panoply)

Playing along with:


Thursday, April 7, 2022

Dreaming Tree Birdhouse Treat Box

“A bird does not sing because it has an answer, it sings because it has a song.” -Maya Angelo


Hey there from Nannyland,

Just a quick post today because I have been gleefully hanging out with my daughter who is visiting for a few weeks from her home in Copenhagen!  She took a road trip to California for a few days to see friends and family, so I've had a short break to create this adorable gable birdhouse treat box for my friend's birthday.  He is an amazing artist and can create the most wonderful things with his hands, including unique and beautifully painted wood birdhouses.  We have a cherished one sitting in our courtyard to greet our guests as they come to our front door. Since masculine cards are not my thing, I was happy to find this fun svg in the Dreaming Tree library as a suitable alternative. It still leans a little to the feminine side but I'm sure he won't mind.  Sometimes he paints vines on the sides of his magnificent bird houses, also!


This box was fairly simple to create with just a few pieces cut out on my Cricut and, as always, wonderful YouTube instructions from Dreaming Tree. I colored the leafy vines with Copics and filled in other areas where I wanted to add depth.  I added small neutral colored paper flowers to the vines and popped a few enamel dots on the window for a little detail.  My construction was certainly not perfect, but I think it will be charming smudged with chocolate and leaking a few tasty crumbs.  And I'm excited to have a cute treat box to add to my crafty project arsenal the next time I need a quick little goodie at the last minute.  

Thanks for visiting Nannyland.
I'll just be here blissfully creating until your next visit.  
Nancy (aka Pink Panoply)

Tuesday, October 26, 2021

Dreaming Tree Le Chapeau Lady - Crafty Chefs Challenge Inspiration

Life is like a new hat.  You don't know if it suits you 
if  you keep trying it on in front of your own mirror. 


Dreaming Tree Le Chapeau svg bundle, Copic markers, digital paper,
Cricut cutting and writing features, swirl embossing folder, pearls and gems, paper flower

 Hey there from Nannyland,

I'm thrilled to join in the fun at the October Craft Chefs Challenge on Face Book.  I was so lucky to have my name drawn last month to receive the "happy mail"  prize and I received the most beautiful card and extra die cuts from Monica ( Sunshine Creativity.)  Hurry...you still have time to pop on over to the Crafty's Chefs Challenge and add your creation to the mix! The recipe this month is:

              Do some coloring
              Use dry embossing.

My elegant lady comes from the Dreaming Tree Le Chapeau svg bundle.  Her fanciness was absolutely delightful to create using my Cricut Maker and Cricut Design Space.  Even though I own oodles of dry embossing folders, I rarely use them, mainly because I forget what a good option they are for adding texure and interest to my die cuts.  I chose to emboss my stylish gal's cascading hair with a swirly folder, creating some perky curls. The curved twigs are also embossed with the same folder. 

My new computer did a wonderful job of printing the coordinating fall digital papers for the hat. The face layers and twigs were cut from cream card stock and colored with Copc markers. The curving feature in Cricut Design Space made it easy to follow the shape of  the hat for my sentiment.  The twigs came from the Close To My Heart Flower Market set, which has hundreds of beautiful garden related images.  The earrings were cut from gold foil card stock and embellished with pearl gems.  The flower came from my stash and was adorned with a fancy coordinating gem. 

Even though my first love is Copic coloring, a close second is creating beautiful dimensional cards in Cricut Design Space, both simple or intricate.  The Cricut Image Libary includes every image I can imagine and there are also tons of  amazing svg's for every occasion available on the internet. It's incredible that just about anything I can envison, I can find the tools to create! 

Thanks for visiting Nannyland.
I'll just be here blissfully creating until your next visit.  
Nancy (aka Pink Panoply)
Playing along with:
 

Thursday, December 26, 2019

Dreaming Tree and La La Land Collide in a Christmas Snow Scene Rescue

A beautiful sight, we're happy tonight
walking in a winter wonderland.


Dreaming Tree SVG. La La Land stamp, patterned paper,
assorted glitter card stock, copic markers, Tombow Mono glue, pop dots, Scor-Pal for z folds

Hey artsy tribe,

As I mentioned in my last  post,  I ended up with a Christmas z-fold card sans a few key pieces.  I couldn't muster the energy to cut all the missing pieces on my Cricut just for one card.  Then I noticed THIS darling La La Land Molli staring up at me from my desk top  just waiting to be colored and placed in a snowy scene in her stylish winter attire   Even her size was perfect!  I'm super happy with the way this card evolved.  I think kinetic cards are a perfect way to add personality and context to my people images.    


I actually think I like this better than my original card.  I can see other charming images living in a multitude of idyllic settings on this z-fold card.  Another happy accident for the books! 

Thanks for visiting.
Go forth and create a masterpiece from the "Island of Misfit Cards.."
Nancy 

Playing along with:
        Watercooler Wednesday Challenge #252
        Dream Valley Challenge #215
        Papercraft Challenges #53
        Lemon Shortbread Challenge #109
        The Paper Shelters Christmas Break Challenge
        Paper Funday Challenge #12
        Scor-Pal December Challenge
        Sweet Stampers Challenge #39
        Crafts Galore Encore December Challenge

Wednesday, December 18, 2019

Snow Scene Z-Fold Christmas Card - Dreaming Tree SVG

Nature is full of genius, full of the divinity; 
so that not a snowflake escapes its fashioning hand.   
Henry David Thoreau

Dreaming Tree Snowed In SVG, Cricut Maker, assorted glitter card stock,
Tombow Mono glue, Tumbled Glass Distress Oxide, silver glossy card stock

Hey artsy friends,

This year's Christmas card for my beloved paper crafting group started out as a fairly simple z-fold Christmas scene.  Many layers and parts later, I realized it was a little more complicated than I had anticipated.  THIS beautiful Dreaming Tree snow scene caught my eye right away when I saw it assembled on You tube.  I admit, I got a little nervous when I cut out all the pieces but actually, the sponging of the snow was the biggest challenge.  All sorts of nooks and crannies!  I didn't plan to do the sponging in the beginning. . . it's usually not my favorite look,  but I realized my snow needed dimension and depth and I'm happy I acquiesced in the end.  


I downloaded the Dreaming Tree SVG to Cricut Design Space and made the intricate cuts on my Maker in a snap.  I  cut a sturdy plain white card base and layered patterned paper on top for the snowy background.  Most of the other layers are glitter card stock with the exception of the moon, which is glossy silver card stock.  I used two different colors of green for the trees to add some depth.  

I made ten of these. . . yeah, I know. . . pretty ambitious.  But my darling friends are worth it!  I always lose a few pieces somehow, so the tenth card was missing a tree and some clouds.  It was a happy mistake, though.  I'll show you the cute card I made in a future blog.

Thanks for visiting.
Go forth and enjoy a magical snowy day...in real life or your imagination. (I prefer the latter. 😁)
Nancy

Playing along with:
        Inkspirational Challenge #202

Thursday, December 12, 2019

Dazzling Christmas Tree Card - Dreaming Tree SVG


“Thank you, dear Creator, for life. Thank you for dreams. Thank you for ideas and thoughts and feelings. Most of all, thank you for choosing me to grow - just for today - and to know the wonder of Your world and its many possibilities.”

― Janie Jasin,  The Littlest Christmas Tree: A Tale of Growing and Becoming


Dreaming Tree SVG, blue, red and green glitter paper, assorted  gems, gold card stock, mounting tape, Cricut Maker


Hey all,

It's that wonderful time of  year when crafters look forward to creating handmade cards to send to their family and friends who live far and wide. Needless to say, they need to be fairly uncomplicated and easy to send through the mail.  By easy I mean not more than 1-inch thick 😁.  Seriously, I know I have to pay more postage to send them but it's worth it to create something special.  Some of my recipients tell me they have  saved them year after year and one of them has even created a banner,  so I feel inspired to make them worthy of display.

This year's card is very clean and simple, by my standards. The tree is created from a Dreaming Tree SVG and I spiffed it up with a star and gift  created in Cricut Design Space.  Shine and sparkle is what I was going for, so I sprinkled gems everywhere.  The card measures 5 1/2 square, which means extra postage, but no worries.  The gems have already put me into the "hand cancel" category.

This is just the beginning of my Christmas crafting blitz.  So much more to enjoy.  After all,  it's the most wonderful ( and frantic) time of the year for us crafty sorts.

Thanks for visiting.
Go forth and enjoy the wonder of the world in all its Christmas splendor.  
Nancy

Playing along with:
        Crafty Gals Corner Challenge #202
        The Sisterhood of Crafters - Christmas
        Paper Funday Challenge #12
        Watercooler Wednesday Challenge #251
        The Holly and Ivy Christmas Challenge #62
        A Place to Start December Challenge
        Make My Monday Challenge #111
        Merry Little Christmas Challenge #17
        A Bit More Time to Craft Challenge #105


Wednesday, October 9, 2019

An October Wedding - The Bride Wore Black


Hey there, 

What?  You think this doesn't look like a typical wedding card...even bordering on inappropriate? Well, please allow me to explain.  My daughter's best friend since high school recently got married to the man of her dreams.  My daughter was extremely honored to be her Maid of Honor.  The wedding dress was chosen months ahead of time under a shroud of secrecy.   I heard from a dependable source that the dress was BLACK.  I know...scandalous!!!  Well, not really.  Not to anyone who knows the stunning bride. She and my daughter were roommates for many years and the two of them were all about anything spooky, mysterious or a little gothie.  Scary movies were regular fare for them.  They've both matured into beautiful women and contributing members of society..my daughter is a Licensed Clinical Social Worker and Therapist and the bride is a college history professor.   But their obsession with all things eerie still persists.  An October wedding is the perfect time to add some magical flair to the wedding festivities.


So, just because I could, I decided to make a very customized card for my beloved friend to show her I love her unique, adventurous personality. My daughter kept me appraised of her reception decor and I knew it would be fabulous! I'm obsessed with sugar skulls so it wasn't much of s stretch for me to add a glamorous cranium to my card.  The card base is a cascade card svg from Dreaming Tree and the personalized label was printed in Cricut Design Studio. My daughter informed me that this card was one of two the bride chose to display on her mantel after the wedding.  That's the joy of card making! 


This stunning dress lived in hiding at my
 house for a week before the wedding.

The cake was so gorgeous, and just look at the cute skulls
guarding it from munchers.
Formal and dignified.  No children allowed. 
Welcome, indeed. 

 I couldn't resist posting this picture of my lovely daughter to show the wedding was elegant and sophisticated, just like her.

Thanks for visiting.
Go forth and show people your unique, lovable self.  
Nancy

Playing along with:
         Crafting By Designs October Challenge
         Crafty Creations Challenge #400
         Creative Moments Challenge #178
         Little Red Wagon Challenge #518
         Watercooler Challenge #242
         Words 2 Craft By Challenge #70
         Arty Divas Challenge #6
         Through the Craft Room Door October 8 Challenge
         Steampunk Challenge
 

Tuesday, August 27, 2019

Fabulous Flamingo with Flair - Dreaming Tree SVG

Stand tall and be fabulous! 


Dreaming Tree svg, glitter gold and pink card stock, pink iridescent sequins, pearls,
Elizabeth Crafts iridescent card stock for flowers, flower die, sentiment stamp, gold leafing pen  
Hey friends, 

I can't believe this darling flamingo svg was FREE in the Dreaming Tree SVG shop.  I really love all their intricate designs and have purchased several, but they also have some very beautiful ones for no charge.  I guess they know once we get in there we will want to buy everything we see!  I'm not a sales rep for their products, just a devoted admirer and customer. Their cuts are so detailed and well designed, I don't need to do much to embellish them.  But, of course, we all have to make our creations our own, so I decided to make my graceful flamingo quite girlie. I adorned her with a pearl necklace and some sparkly pink sequined wing feathers. I suppressed my nail polish urge as a bit over the top, but I still think she would look lovely with a fancy manicure.  


This shaped card left me with some real estate to embellish on the inside panel so I popped up some pretty pink iridescent flowers hanging from the tree branch in the corner.  I used pink and blue glitter paper for my image cut outs to add some additional subtle glitz.  Nothing beats a fancy flamingo with flair except maybe five of them!  Five fancy flamingos with flair...from Florida.  Okay, I digress.  My sentiment had to be long and narrow to fit behind the image without showing on the front.  I thought this sentiment was perfect, but I had to google flamingos to make sure they fly.  They certainly do, which makes them even more fascinating. Five FASCINATING FLYING flamingos with flair from Florida.  I need a nap.

Thanks for visiting.
Go forth and fly like the fabulous flamingo you are!
Nancy

Playing along with:
        Creativ Fusion Challenge #13
        Path of Positivity Challenge #71
        Patties Creations Design Challenge #161
        Cardz 4 Galz
        Time Out Challenge #142
        Creations in Pink Challenge #13
        Sparkles Monthly Challenge #119
        Crafting Happiness Challenge #11