
Flowers always make people better, happier and more helpful;
they are sunshine, food, and medicine to the soul.

Hey there from Nannyland,
After spending countless blissful hours creating unique handmade cards, I want my embellishments to reflect my attention to detail. Most of the images I color are frilly and feminine so flowers, gems and glitter are perfect adornments to add a little dazzle. Heartfelt Creations stamps, dies and molds are the ideal tools for creating fabulous shaped flowers of all varieties, sizes and colors. (Not an advertisement. I just like them.) Each of the several steps it takes to shape them is more delightful than the last. Recently, I took some time out to replenish my bloom stash and I snapped some pictures at each stage so I could show you what all the fuss is about.

This is what I'm going for.
I love this rainbow of sparkly goodness. Here's how I did it:

I mounted all sizes of the Oakberry Lane Blossom cling stamps, along with the leaf, on my 6" x 8"
Fiskars Stamp Press. I like the larger size press because I can get the whole stamp set on it at once.

I stamped the images on white card stock with Tim Holtz distress ink.
Light card stock holds up better with all the spritzing and handling.

The sponging doesn't have to be perfect at all. In fact, the more streaked the color is,
the more texture the flowers will have when they are layered and assembled.

The coordinating dies fit the stamps beautifully and are grouped for easy cutting.
I used my Gemini Junior to cut them but any cutter would work.

I placed the individual die cut flowers into the mold face down,
sprayed them lightly with water and carefully snapped on the top.

I used my Big Shot Pro die cutting machine to squish them.

Here's a comparison of the flowers before and after they go through the machine.
Look how much texture is achieved with the mold! (left)
That would take forever with flower shaping tools.
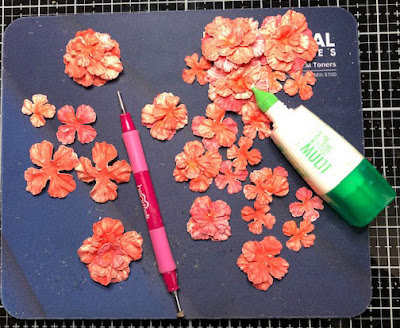
After the layers dried, I cupped the flower centers using a ball tool on a foam mat,
added a dot of Tombow glue to the flower center, placed another flower layer on top
and pressed with the ball tool. I repeated this step again to create a flower.
I like to put two layers of one size petals on the bottom and then add graduating layers.
You can add as many layers as you like. I use a lot of smaller sizes on my cards,
so I always make sure to create several of all sizes.

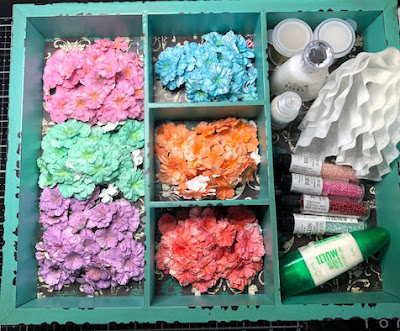
Here they are all lined up and ready to embellish! Now the real fun starts
.
I used Tombow glue to dot the flower centers and pour small beads on the glue.
I removed the excess and let it dry completely and then I edged the petals with
glitter glue for lots of sparkle. I left a few flowers without the glitter for a more
subtle look. Either way, they look fabulous.

Pretty all finished on my desk, pretty in jars on my shelves,
but the prettiest adorning my handmade cards.
Thanks for visiting Nannyland.
I'll just be here blissfully creating until your next visit.
Nancy (aka Pink Panoply)
No comments:
Post a Comment