Monday, December 31, 2018

Conie Fong Garden Fairy - Kit and Clowder Copic Class

Fairies dance and tell secrets at the bottom of the garden. 


Copic markers, Conie Fong digi, Cricut Design Space frame, pink cardstock, gold metallic cardstock,
daisy embellishment, swirl punch

Hey everyone,

I'm hoping for a little magical fairy dust in 2019; how about you? It's sometimes intimidating to create a card for my amazingly talented artist friend's January birthday, so I usually spend some extra time coloring an image with my copics and fretting a little over the design  But I never worry if she'll like it because she's always so supportive and generous with her praise...like a true artist.  I decided  this sweet Conie Fong garden fairy that I colored for my December monthly Kit and Clowder class would work very nicely for her card. The coloring was a little more challenging on this smaller 4 x 6 canvas because I sized it to fit the front of a 5 x 7 card, allowing room for a frame.  The background also took up some card real estate, but I always love it when our teacher, Alyce Keegan, adds a background to the image because it adds so much depth and really stretches my coloring skills.

The images Alyce chooses for her classes are lovely and can stand on their own when colored, but I usually prefer to make them into cards to send to special people who will appreciate the hours of work I put into them.  I looked through all my beautiful fancy die cut frames and realized they were much too ornate for this detailed image.  Once again, my Cricut was the answer.  I found this simple frame in Cricut Design Studio, sized it to fit my image perfectly and cut it out in pink, with a small metallic gold edging.  Its simplicity keeps the beautiful forest scene in focus.  I added a little daisy embellishment and metallic gold swirl to one corner to mirror the daisies in my image and the gold on the frame.

Why did I ever imagine I was getting tired of fairies?  They're so delightfully whimsical and they're always there to lift us when we're down.  I'm a believer.

Thanks for visiting.
Go forth and create something fabulous.
Nancy

Playing along with:
        Water Cooler Wednesday Challenge #201

Friday, December 28, 2018

Machine Appliqued Lion Bib and Giraffe Self Binding Receiving Blanket


My friend was blessed to receive a very special late Christmas gift this year.  Just two days after Christmas, her daughter gave birth to an adorable baby boy, who joins three very jubilant siblings. I always keep a few of my machine appliqued baby bibs and blankets on hand for these joyful events because they happen so often!  If riding in a one-horse open sleigh is fun, then making these bibs and blankets must be a close second.  There is a huge variety of darling digital embroidery patterns on the internet so personalizing is a snap. Immediate downloading is also a perk.  Etsy is my favorite place to shop for baby embroidery files because the many and varied sellers offer the cutest original digital files and so far they have all stitched up beautifully. The cute little lion on this handmade patchwork bib was very simple and fun to stitch. You can check out some others I have created and the directions for them  here and here.


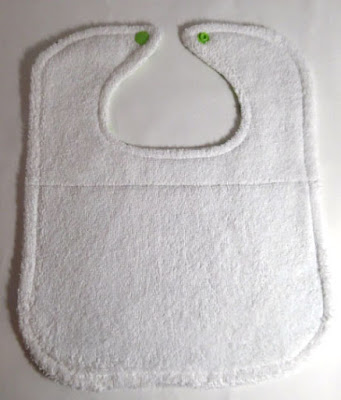
I always add an absorbent terry cloth backing and easy to use snaps on my handmade bibs.


Also waiting in my stash for this sweet little guy to cuddle in was this colorful giraffe receiving blanket  


Here are some good instructions on how to create this flannel self binding blanket.

And, of course, a matching card.  

Can't wait to bundle my handmade love in a bright package and go visit this little cutey and his  happy, relieved mom.  

Happy New Year, Everyone.

Thanks for visiting.
Go forth and create something fabulous.
Nancy


Saturday, December 22, 2018

Snowflake Fold and Flip Christmas Card - Sizzix Thinlits Die Set

Like snowflakes, we are all beautiful in our own way.


A group of my talented crafting buddies meet once a month to do parchment craft cards and I  hate to admit it, but I'm a Pergamano dropout.  I have all the tools from classes we took together, but I just can't seem to commit myself to all the hours it takes to complete these gorgeous projects.  So when I needed a card to make for these ladies for our annual Christmas lunch, I wanted something fancy and lacy, without having to take my tools out and struggle through a parchment project.


My friends would have appreciated any handmade card I chose to make, but I was surprised and delighted when I found this Sizzix Christmas snowflake thinlits die set in my stash from years gone by!  The center die cut images are meant to create a completed fold and flip card,  but I chose to mount the assembled card on my usual a 5 x 7 card stock base.  I used white and two shades of blue glitter card stock for my die cuts. Rhinestones were added to my snow flakes for added sparkle.  My white front panel needed some texture, so I embossed a chevron design to mimic some of the snowflake geometric designs.

The pretty layered snowflake opens up to reveal some die cut seasonal words in glossy silver.  Noel was included in the set, but I chose to use just the other three die cut words. 

Best of all, this card is a two-fer.  When the snowflake is opened on the front of the card, a beautiful message is revealed and then I get another opportunity  for a sentiment on the inside of the card.  Lot's of convenient card real-estate for sending good wishes.

Speaking of good wishes, I wish you all a very Merry Christmas and a blessed 2019.

Thanks for visiting.
Go forth and create something fabulous.
Nancy 

Playing along with:


Wednesday, December 19, 2018

Celebrate the Joy of the Season - Lori Whitlock 3-D Snowman SVG

Snowman Wisdom: Stand tall, be cool, accessorize, smile, make people happy just by being you, go outside, things will all turn out if you just stick together. 


Lori Whitlock svg, dotted and glitter Bazzill card stock, Nuvo Drops, rhinetones, 
Merry Christmas, everyone.

A cheerful wintry snowman scene seemed like the perfect way to wish my loved ones Merry Christmas this year.  It's  about 60 degrees outside right now in sunny California so conjuring up a white Christmas in my craft room is a fun way to get in the spirit.

I made about thirty of these cards, so I needed them to be less labor intensive than my usual cards, but I wanted them to also reflect the love and care I spent making them.  I chose this cute Lori Whitlock svg and cut the layers out on my Cricut Explore Air. I created dimension be alternating dotted and glitter Bazzill card stock for the sky, snow and card front.  The smaller pieces like the nose and holly were cut out on plain white cardstock so I could easily color them with my Copics.  This is so much faster and easier. Why didn't I think of this earlier?

The shiny black eyes and buttons on my snowman are black Nuvo drops.  I added rhinestones to the centers of my snowflakes for sparkly dimension.


A little sprig of pine and a rhinestone embellish the die cut inside message.

Thanks for visiting.
Go forth and create something fabulous.
Nancy

Playing along with:


Tuesday, December 18, 2018

Quilted Fabric Trays - Benartex Blue, White and Yellow Layer Cake

My creative tribe and I never seem to have enough storage for all our crafting paraphernalia, so I knew this quilted fabric tray would be the perfect little Christmas gift to sew for my paper crafting besties.  I had a Benartex layer cake in my stash with cheerful designs and colors that look a lot like the designer paper we use on our cards. A quick "fabric tray" google came up with a few different options for making the tray, so I combined all my favorite instructions and came up with this fun and easy result.


An old tea napkin holder that  I bought years ago at a craft fair helped me determine the size for my trays.  I was excited when I realized these dimensions were the perfect size to use with a ten-inch layer cake.  I have actually used my napkin holder many times, so I bought packages of napkins to fill my trays for a cute gift presentation. The size of the bottom of your tray will depend on the depth you choose to sew the sides.  My sides are 1 1/2 inches high and the bottom is about 5 3/4 inches square. These portable, lightweight trays are very versatile for other uses (see above).  I think my friends will enjoy using them for little crafty embellishments like sequins,  rhinestones and charms, as well as small dies and die cuts and, well, anything they want to keep track of in the sea of creativity that usually ends up in their craft space.  I can't wait  to make a few red and white ones for my craft room when the Christmas craziness is over.  Here's how I made them:


Iron fusible fleece to the wrong side of
one square.

Start with  two ten-inch squares of fabric
Sew right sides together and trim corners.
Leave a small opening for turning.


Turn right side out and push out corners
with a skewer.


Mark for quilting.
Quilt as desired.

Mark corners with handmade template
 and sew. Size will depend on how deep
you want the tray to be.
  So easy for assembly line quilting.
.


One layer cake makes about 20, so make a bunch!


Thanks for visiting.
Go forth and make something fabulous.
Nancy

Tuesday, December 4, 2018

Stampendous Christmas Card - Laurel Burch and Copics


Let there be peace on earth, and let it begin with me.  


Hey there,

Laurel Burch and Copic markers go together like Christmas cookies and hot chocolate, don't you think?  It was a delight coloring this sweet little cat and dog duo from Stampendous in vivid colors (ala Laurel Burch) for the focal point of a Christmas card I recently created for my besties. I thought this cute, cuddly image fit well  with my message of "peace on earth."  I used a Lori Whitlock svg for my side step base, cut coordinating mats for the card front and stairs, and sized it to my favorite 5 x 7.  

The "PEACE ON EARTH" letters were a snap to weld to the separate card mats in Cricut Design Space and provided stability and precision when I glued the glossy red letters on top. I cut a few pine sprigs for embellishments to fit the steps and added Christmas Red Stickles for berries. My  handy go-to Nuvo drops worked perfectly on the  spots and fringe to add a little texture and shine. 

One note of caution, though. Glue and glossy card stock don't make the best marriage.  Even the smallest amount of  glue shows on the card stock and it's hard to clean up or disguise.  I used a small alcholol wipe for clean ups, but it removed some of the color on the cardstock in some areas.  A little glossy card stock goes a long way...something to remember in the future!

Side step cards leave a lot of  fabulous "real estate" for imagining and creating.  I definitely need to design cards with this versatile base more often.

Thanks for visiting.
Go forth and create something fabulous.
Nancy

Playing along with:

Wednesday, November 21, 2018

Owl Treat Box - Cricut Pillow Box Cut

"As far as I'm concerned, candy corn is a vegetable."

 Cricut owl pillow box,  Kraft card stock, Nuvo drops, Bazzil Dotted Swiss card stock, Tim Holtz sanding tool, leaf  brad embellishment, black epoxy dots for eyes

Hi everyone, 

My Cricut is my favorite tool when I need to come up with a cute favor for any occasion.  I wanted to take a festive treat to my besties for our bi-monthly paper crafting group and I was excited to find this darling owl pillow box cut in Cricut Design Studio for only a dollar.  


Dressed in fall colors and filled with the tastiest of fall candies, I knew this little lady was bound to please.  I sized her body at 5 " by 6" so I could fill her with a heaping bag of candy corn goodness.


My friends loved her and were happy to enjoy some goodies while we crafted. Although we'll have to say goodbye to candy corn to make way for all the delicious traditional Christmas delights. there's no problem here.  It was simple to embellish this basic owl Cricut cut in red and green holly and fill her with Christmas candy for the ladies at my Daughters of Utah Pioneers Christmas dinner.  Like I said, I love my Cricut!!!

Happy Thanksgiving, everyone.

Thanks for visiting. 
Go forth and create something fabulous.
Nancy 

Playing along with:
        Get Creative Challenge #75
        Unstampabelles Challenge #85
        Artistic Inspiration Challenge #209
        The Paper Players Challenge #419
        Die Cuttin Divas Challenge #396
       

Friday, November 9, 2018

Conie Fong Digi Mermaid - Kit and Clowder Marker Class

Signs you  might be a mermaid:  You ride out the storm,  you dance in the rain,  you "sea" beauty in life,  you play in the waves.

Connie Fong digi from Etsy, Copic markers, 6 x 6 card base, white gel pen, glossy gold card stock, pearl accents

Hi everyone, 

Coloring with my Copic markers is definitely my favorite way to spend time in my craft room.  I enjoy spending hours practicing and learning new skills and techniques.  Alyce Keegan of Kit and Clowder offers monthly online classes where she shares her amazing artistic expertise by video with written and illustrated step-by-step instructions so her students can follow along.

This mermaid project was from Kit and Clowder's May 2017 markers class using  this Conie Fong Ariela digital image and includes fundamental techniques for sand, water, rainbow shading and scales.  Even though it was my first time attempting some of these techniques, there certainly was a learning curve and I definitely need a lot more practice,  I love the way this sweet little  mermaid turned out.  Coloring in a bright rainbow palette always makes me happy!

I framed her in a glossy gold cardstock frame cut in Cricut Design Studio and added pearls for accents, of course!  I think  she is colorifically magical.

Thanks for visiting.
Go forth and create something fabulous.
💙Nancy

Playing along with:


Saturday, October 27, 2018

Jeremiah Ketner Dragonfly Beauty - Copics and Cricut...Again

Do not wish to be anything but what you are and do it perfectly.


Jeremiah Ketner digital image, Copic markers, Anna Griffin frame, glitter card stock, blue iridescent pears, rhinestone corner stickers, Elizabeth Crafts peel off glitter dots, white gel pen 

I never saw a dragonfly I didn't like and this sweet Jeremiah Ketner digi,  aptly called "Dragonfly," caught my eye immediately among all his amazing artwork.  I loved coloring her in my favorite Copic combo for the focal point on my sweet friend's birthday card .  The loopy layered Anna Griffin frame  from my Cricut image library  perfectly mimics the flight of the very energetic dragonfly  that landed on my card to embellish it.  The frame originally extended beyond the left side of the card, but I took some creative license and trimmed it even with the card.  I added some rhinestone corner stickers to balance out the design.

I find adding small details with my white gel pen really pulls it all  together when I'm finished coloring.  I used dots on the flowers and the dragonfly body, as well as my usual eye and lip sparkle. The centers of the background stars are brightened with Elizabeth Crafts  peel off glitter dots and iridescent blue pearls gussy up the dragonfly embellishment.

This is the last of my three October birthday cards.  Now on to Thanksgiving and Christmas.  The frenzied fun never ends!!!

Thanks for stopping by.
Go forth and create something fabulous.
Nancy

Playing along with:
        Creative Fingers Challenge #153
        Fussy and Fancy Challenge #223
        QKR Stampede
        Cardz 4 Galz
        Crafty Creations Challenge #377
        Word Art Wednesday
        Lemon Shortbread Challenge #79
        Through the Craft Room Door


Tuesday, October 23, 2018

Promise of Spring Fairy - Norma Burnell Digi in Copics

"Just as the bird sings or the butterfly soars, because it is his natural characteristic, so the artist works."     Alma Gluck

Copic markers, Elizabeth Crafts Dies, Norma Burnell digi image, white gel pen, purple and blue glitter card stock

Norma Burnell creates the most beautiful fantasy art images with  loads of detail and interesting elements. It's a little intimidating trying to figure out where to start my Copic coloring, but it doesn't take long to get in the zone and the project comes together before I know it.

I used a lot of blue on this beautiful Spring Fairy image because it's my birthday recipient's favorite color. I sized the layered Anna Griffin frame in Cricut Design Studio to 5 x 7 and cut it out of lavender and blue glitter card stocks. The Elizabeth Crafts butterfly die cut is layered in vellum and blue card stock layers with blue iridescent pearls for the body.

It can be Spring any time of year in Copic Land.  That's why I visit there so often!

Thanks for visiting.
Go forth and create something beautiful.
Nancy

Playing along with:
        Aurora Wings Challenge #72
        Crafty Cardmakers Challenge #220
        Crafting from the Heart Challenge #225
        Lil Patch of Crafty Friends Challenge #92
        The Corrosive Challenge #10
        Color Crazy Challenge #42
        Morgan's Art World #10
        Polkadoodles Challenge #42


Friday, October 19, 2018

Jeremiah Ketner Digi Birthday Card - Copic and Cricut

“Kindred spirits are not so scarce as I used to think. It’s splendid to find out there are so many of them in the world.”   Anne of Green Gables 


Jeremiah Ketner Digi, Anna Griffin cut file in Cricut Design Space, Elizabeth Crafts butterfly, Copic markers, white gel pen, paper  flowers, rhinestones, blue pearls, red glitter and yellow card stocks

This gorgeous Jeremiah Ketner digi just screamed for some sassy blue hair to go with her jazzy red dress.   These beautiful feminine Ketner images are a dream to color because they have so much gorgeous detail.  

My fancy frame is an Anna Griffin cut from Cricut Design Space, sized at 5 x 7.  I mounted my image on foam tape and added a little more dimension to my card with a layered Elizabeth Crafts die cut butterfly.  The pretty flowers that adorn this stylish lady's hair are accented with mini paper flowers, rhinestones and a few white gel pen dots.

I love spending time making special birthday cards for my creative friends because I know they  appreciate the time and love that went into them,  just as I cherish the cards they so  artfully make for me.  

Thanks for visiting.
Go forth and create something fabulous.
Nancy

Playing along with:
        Digi Chooseday Wk 42


Friday, October 12, 2018

Prima Carina Sugar Skull - Copic Markers and Spellbinders

"Our family is the focus of our greatest work and joy in this life; so will it be throughout all eternity."  Russell M. Nelson


When I saw this beautiful Sugar Skull stamp from Prima Marketing, I knew I had to have it.  My fascination with sugar skulls has been growing exponentially for the past few years.  I'm pretty sure it started with  the  dazzling young ladies dressed up in full sugar skull regalia at the Lahaina Halloween party a few years ago. I was memorized by the beauty of  their vivid traditional costumes.  Some of my friends suggested  I watch the sweet movie "Coco" and I was charmed and bewitched. I'm a family history and genealogy enthusiast and volunteer weekly at our local Family History Library helping others learn about their ancestors. I love the heartwarming Day of the Dead tradition of gathering with family and friends to pray for and remember loved ones who have died  and  help support their spiritual journey.

This very large 5 x 7 inch stamp leaves little room for embellishments on a card but when colored with bright copic hues it doesn't need much else.  I wanted Carina to have a backdrop as glamorous as she is so I chose this intricate Spellbinders frame as her backdrop.  Photography never does the gold card stock justice, but I love the elegant shine in real life. The sentiment that comes with this image is so perfect, I just had to squish it somehow on the front of my card.  Somehow everything seemed to come together in the end.

Don't you just love coloring images that speak to your heart?

Thanks for visiting.
Go forth and create something fabulous.
Nancy


Playing along with:
        Time Out Challenge #120
        Aud Sentiments Challenge #214
        Patties Creation Challenge #151
        Addicted to Stamps Challenge #313
        Scrapy Land Challenge #99
        Papercraft Challenge #22
        Tuesday Throwdown Challenge #413
        Stinkin Inkers Challenge - The Eyes Have it


Saturday, October 6, 2018

For Rosie - Machine Embroidered Ballerina Quilt

   👉   I love these little people; and it is not a slight thing when they, who are so fresh from God, love us.   Charles Dickens  

Embroidery Library Ballerinas,  Accuquilt Go Big fabric cutter and dies, Riley Blake Fabric, Isacord  Thread, Embrilliance Embroidery Software

When one of my dear friends excitedly announced she was finally going to get her first girl grandchild, I joined in  her elation.  All of her grandchildren so far are boys, and this little sweetie has been greatly anticipated.  Then, when she announced the baby's name was going to be "Rosie," my head swam with delightful ideas on a gift I could make for her.   


I knew I had these adorable Ballerina embroidery files from Embroidery Library just waiting to dance on a darling little girl's quilt.  Their flower tutu's are perfect for a beautiful garden in which Rosie takes center stage in the middle block.  My Embrilliance Embroidery Software allowed me to resize my ballerinas to fit my six-inch blocks and curve Rosie's name around the rose tutu in the center block .My Accuquilt Go Big fabic cutter is always my favorite way  to cut perfectly accurate blocks and sashing.  Beautiful floral Riley Blake fabrics created a lovely palette for my quilty flower bed. I didn't photograph the backing before I sent the quilt, but the fabric matches one of the floral prints on the front.  I stitched in the ditch to quilt and handmade some of my favorite striped binding.  Now all this quilt needs is a little sweet  baby slobber to make it perfect!

I love making baby quilts so much because the recipients are definitely my favorite people!  

Thanks for visiting.
Go forth and create something fabulous.
Nancy

Thursday, October 4, 2018

Norma Burnell Witch - Copics and Cricut


When witches go riding and black cats are seen, the moon laughs and whispers "tis near Halloween. - Unknown


Double bubble, toil and trouble.  I certainly had more fun than  trouble coloring this fabulous Norma Burnell digi image with beautifully vivid fall colors. Who says witches can't be trendy and glamorous?   I loved coloring all the intricate details on her amazing dress with my Copics and then adding extra depth  with my Prismacolor pencils.  Cricut Design space is always a good source for fun holiday images and this bat frame creates the perfect stage for this classy lady.  I cut the layers in black and white glitter paper and attached them to a white 5 x 7  card base.  The cute sentiment stamp from Stampendous says it all.

Like many of you, I love all things Halloween and I was delighted to find an image that matched my "fancy lady" style. I think I'll send this to my "girlie" friend to inspire her to create some magic in her life this Halloween.  

Thanks for visiting.
Go forth and create something fabulous.
Nancy 

Playing along with:
        Cupcake Inspirations Challenge #455
        Crafty Creations Challenge #375
        Darling Cardmakers Challenge - With a Flourish
        Crafty Gals Corner Challenge #175

Friday, September 21, 2018

Golden Anniversary Cricut Classically Modern Gatefold Card - Tiddly Inks Honeymooners Digi

  In vain I have struggled. It will not do. My feelings will not be repressed.  You must allow me to tell you how ardently I admire and love you.    Mr. Darcy  - 😍 Pride and Prejudice 


This adorable Tiddly Inks Honeymooners image from the July Kit and Clowder Copics Class couldn't have been more perfect  to create a fun Golden Anniversary card for my honey of fifty years.  A beautifully intricate  Cricut Design Studio  gate fold card from the Classically Modern Cards Cartridge was the perfect base to showcase these cute newlyweds riding off into the great unknown to start their new life adventure, just as my sweetheart and I did  50 years ago.  We drove from Ogden, Utah  to  Glendale, California three years after we were married and haven't left the amazing Golden State since.

Copic makers, Tiddly Inks digital image, Cricut Design Studio gatefold card (Classically Modern Cards), glossy gold cardstock, gold cording, computer generated sign

In class we learned how to create the background from scratch for this fun vintage image   I know there is a cool way to print words  directly  onto an  image in Word, but I didn't have the time nor energy to figure it out, so I just typed and sized my Doug and Nancy sign, cut it out, sponged the edges and popped it up on my card with some shallow pop dots. I'll save the technology lesson for another day.


It's amazing how fun it is to create depth and interest for a stamped image just by using a few simple copic techniques.  It takes some work, and I definitely need a lot more practice.  but I think it's well worth the learning curve!

Thanks for visiting.
Go forth and create something fabulous.
Nancy

Playing along with:


Wednesday, September 12, 2018

Cricut Happy Fall, Y'all - Lori Whitlock Pop Up Box Card

👉  "Winter is an etching, spring a watercolor, summer an oil painting, and autumn a mosaic of them all."  - Stanley Horowitz


.   
I have oodles of delightful house images in my craft stash in every form...stamps, die cuts, embossing folders, designer paper, fabric..apparently I'm obsessed.  I'm obviously drawn to these cozy images and the warm feelings they evoke.  This darling Lori Whitlock Pop Up Box Card House has been patiently waiting for my attention for ages and I finally found the perfect way to make it my own. I traded it's original sunshiny summer scene for a warm, vibrant fall landscape.


The cut already had everything I needed to create a charming autumn neighborhood.  I added a few more colorful trees from Cricut Design Space which I easily sized in different styles to fit my variegated orchard.  Patterned designer paper in dots, checks and swirls is always a fun choice for tree leaves and I sponged the edges with distress ink to soften the colors. I changed the original sentiment to "Happy Fall, Y'all" and viola, a colorful fall greeting for my friends, ushering in my favorite season.  Now I'm off for a walk in the gorgeous wetlands near to my home to watch the trees slowly evolve into a vivid kaleidoscope of color. It will take awhile but it'll be fun watching the daily transformation and well worth the finale.  Awww, Autumn.

Thanks for visiting.
Go forth and create something fabulous.
Nancy

Playing along with: